- Регистрация
- 17 Февраль 2018
- Сообщения
- 22 712
- Лучшие ответы
- 0
- Баллы
- 2 093
Offline
Paint.net is a kind of a budget version of Photoshop, but we don’t want to talk down this sophisticated and free image editing program. The developer dotPDN provides versatile and flexible software that makes semi-professional image editing child’s play. The program has been continuously developed over the past few years and is now available with impressive features.
The only drawback of the freeware is that anyone who has never worked with it before can easily overlook the most ingenious tools and extras. We dedicate ourselves to the image doctor and present the five best functions of Paint.net in this article.
You can download Paint.net for free here. The program is also available from the Microsoft Store, but costs $9.99. The current Paint.net has the following requirements:
Foundry
Foundry
Foundry
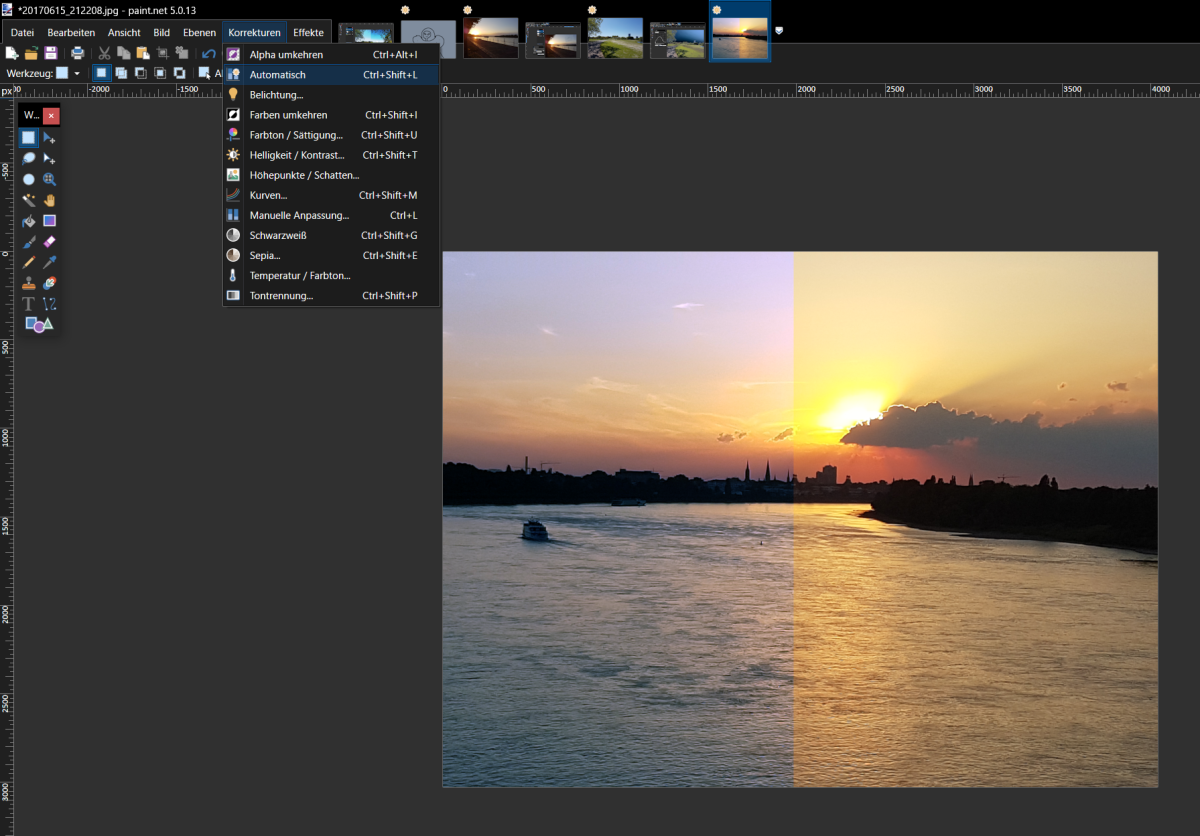
Even without getting lost in the depths of functions and complex tools, Paint.net allows you to spruce up images in a flash. A powerful auto mode is available for this purpose, which optimizes contrast, saturation, and brightness. In the image above you can see what the function achieves on its own. The left-hand image section has been optimized and the right-hand section is the original. The optimization makes details stand out better and colors look more realistic.
You can find the automatic adjustment in the Corrections menu under Automatic or with the key combination Ctrl+Shift+L.
Adjust luminosity and brightness precisely with Curves

Foundry
Foundry
Foundry
In some pictures, you’ll notice areas that are too bright or too dark creep in again and again. Because only parts of a photo are affected, you don’t want to use the slider for brightness or contrast to help, as this always changes the image as a whole. Paint.net offers a solution to this problem.
You’ll find the very practical Curves in the Corrections menu. We can also get there by pressing Ctrl+Shift+M. These curves can be used to adjust the luminosity or brightness of individual color channels specifically only in light or only in dark image areas.
So, if you want to brighten up an image section that is too dark, you don’t have to make the whole image brighter and risk ruining the correctly photographed image sections.
In the Curves window, you can adjust the dark image sections by adjusting the straight lines at the bottom left and make corrections to the light image sections at the top right. Any anchor points can be set with a mouse click, which can also be removed again with the right mouse button.
We can use this function to adjust images discreetly or change them profoundly and spice them up artistically. To adjust the luminosity of individual RGB color channels, simply switch to RGB under Transfer Assignment.
Using layers
Foundry
Foundry
Foundry
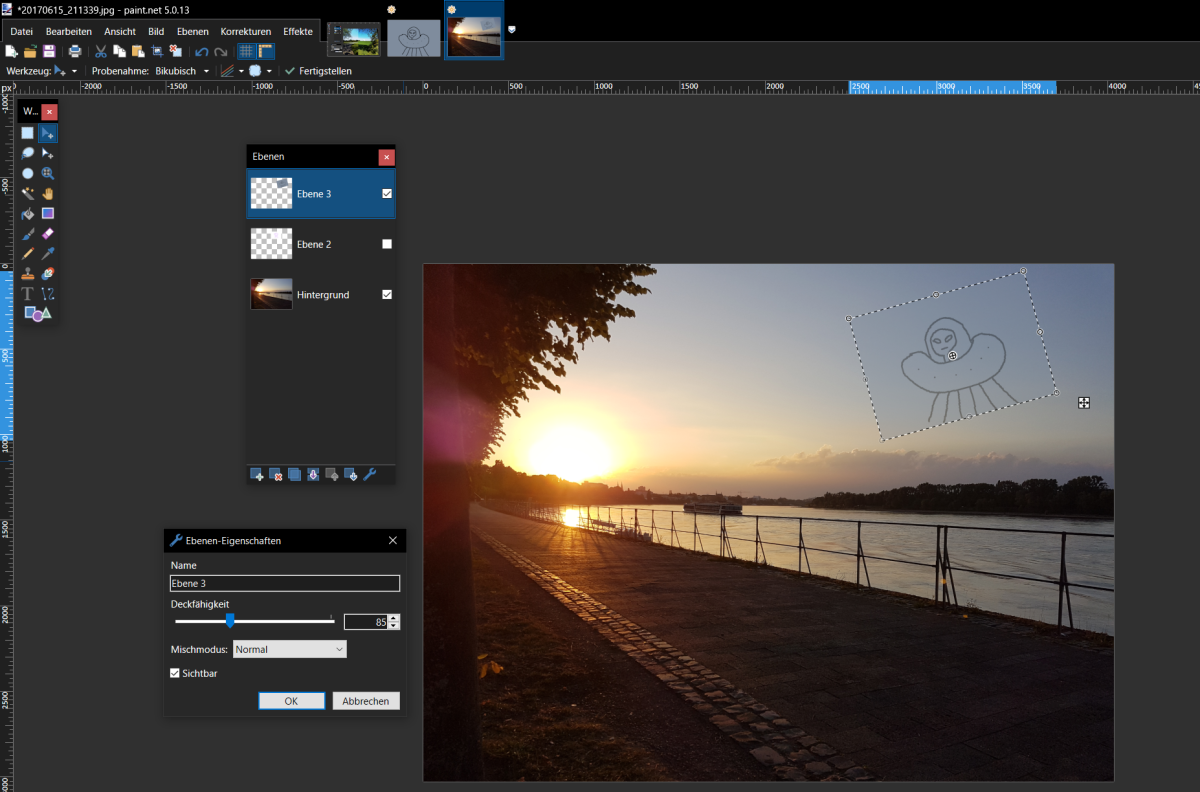
Layers can be used to change image content in impressive ways or create completely new image compositions. Paint.net provides this function in the layer window. Such image layers can be swapped, copied, or faded in and out. You can also use transparency effects to merge layers, change color tones, and much more. If you do not see the layer window, tap F7 once in Paint.net.
Below the layers window you will find a number of useful functions. There we can add any new and initially empty layers using the plus symbol. To fill such layers with color or with an image, you first have to click on them. You can then use Ctrl+V to paste copied or cut content directly.
Editing with tools is also easy. You can, for example, color layers completely with the bucket tool and then use the transparency effect to cast a shadow on another layer.
Changes are only visible in the topmost of all displayed layers. However, you can also drag individual layers up or down in the hierarchy and show or hide them. To do this, we can simply tick or untick the box next to the name of the respective layer in the layer window.
You can also adjust the transparency of individual layers using the tool icon in the layer window. There, the opacity can be set in 256 levels for each layer.
Use effects to enhance images or turn them upside down artistically
Foundry
Foundry
Foundry
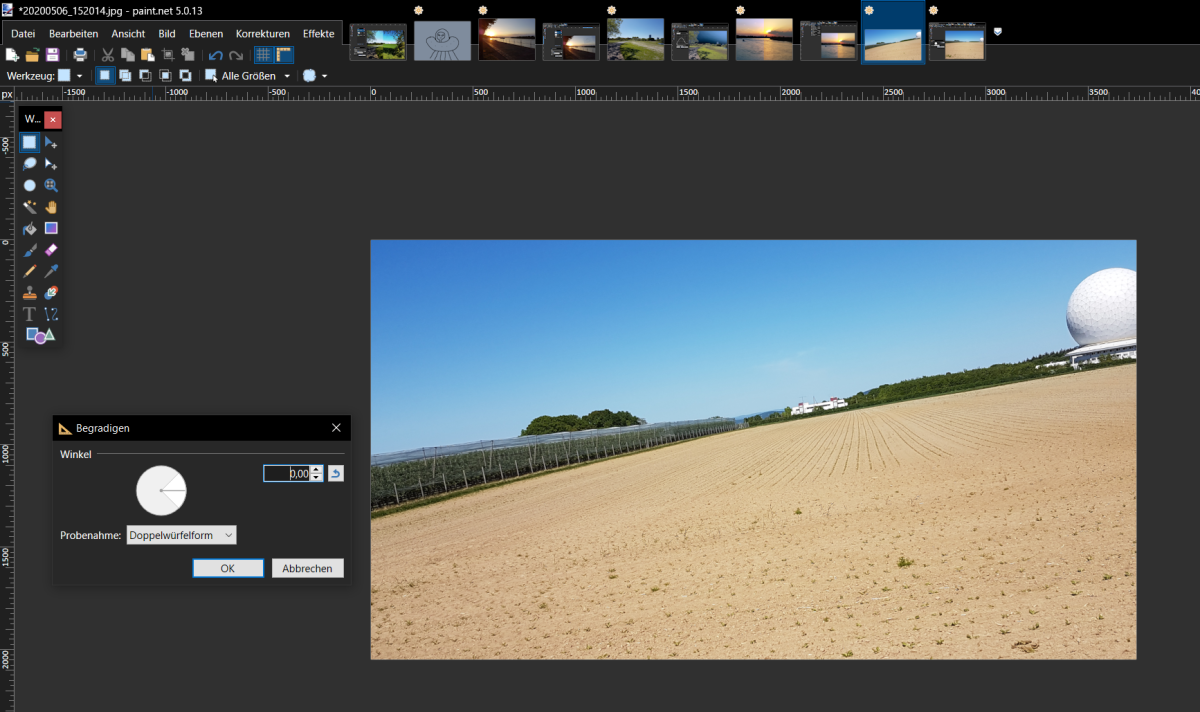
We’ve all been there. In the heat of the moment, you hold your camera or smartphone at an angle and what should be a beautiful subject ends up looking crooked in the picture.
Instead of having to go through the tedious process of editing the photo and then cutting away the empty areas around the edges of the image, Paint.net takes all the effort out of the equation. To do this, select the Photo field in the top menu bar under Effects and then Straighten.
If Paint.net does not straighten the image by itself, we can help in the small work window (either with numerical values or by dragging with the mouse in the circular window).
The function automatically zooms past the empty spaces that inevitably occur when rotating, but you will also lose sections at the edge of the image just like when manually straightening.
You will find other useful functions under Effects / Photos. There you can, for example, remove red eyes, create an appealing image focus using a vignette, or conceal skin blemishes (soften portrait).
Save time with hotkeys
Foundry
Foundry
Foundry
Paint.net provides practical hotkeys for many functions. Instead of having to click around in the same menus and tool windows again and again, we can complete many tasks in no time at all. The best key combinations include:
The only drawback of the freeware is that anyone who has never worked with it before can easily overlook the most ingenious tools and extras. We dedicate ourselves to the image doctor and present the five best functions of Paint.net in this article.
You can download Paint.net for free here. The program is also available from the Microsoft Store, but costs $9.99. The current Paint.net has the following requirements:
- Windows 11
- or Windows 10 (version 1809 or newer)
- or Windows Server 2019
- or Windows Server 2022
- 64-bit CPU (Intel/AMD x64 or ARM64)
- Optional: drawing tablet with support for Windows Ink
Foundry
Foundry
Foundry
Even without getting lost in the depths of functions and complex tools, Paint.net allows you to spruce up images in a flash. A powerful auto mode is available for this purpose, which optimizes contrast, saturation, and brightness. In the image above you can see what the function achieves on its own. The left-hand image section has been optimized and the right-hand section is the original. The optimization makes details stand out better and colors look more realistic.
You can find the automatic adjustment in the Corrections menu under Automatic or with the key combination Ctrl+Shift+L.
Adjust luminosity and brightness precisely with Curves
Foundry
Foundry
Foundry
In some pictures, you’ll notice areas that are too bright or too dark creep in again and again. Because only parts of a photo are affected, you don’t want to use the slider for brightness or contrast to help, as this always changes the image as a whole. Paint.net offers a solution to this problem.
You’ll find the very practical Curves in the Corrections menu. We can also get there by pressing Ctrl+Shift+M. These curves can be used to adjust the luminosity or brightness of individual color channels specifically only in light or only in dark image areas.
So, if you want to brighten up an image section that is too dark, you don’t have to make the whole image brighter and risk ruining the correctly photographed image sections.
In the Curves window, you can adjust the dark image sections by adjusting the straight lines at the bottom left and make corrections to the light image sections at the top right. Any anchor points can be set with a mouse click, which can also be removed again with the right mouse button.
We can use this function to adjust images discreetly or change them profoundly and spice them up artistically. To adjust the luminosity of individual RGB color channels, simply switch to RGB under Transfer Assignment.
Using layers
Foundry
Foundry
Foundry
Layers can be used to change image content in impressive ways or create completely new image compositions. Paint.net provides this function in the layer window. Such image layers can be swapped, copied, or faded in and out. You can also use transparency effects to merge layers, change color tones, and much more. If you do not see the layer window, tap F7 once in Paint.net.
Below the layers window you will find a number of useful functions. There we can add any new and initially empty layers using the plus symbol. To fill such layers with color or with an image, you first have to click on them. You can then use Ctrl+V to paste copied or cut content directly.
Editing with tools is also easy. You can, for example, color layers completely with the bucket tool and then use the transparency effect to cast a shadow on another layer.
Changes are only visible in the topmost of all displayed layers. However, you can also drag individual layers up or down in the hierarchy and show or hide them. To do this, we can simply tick or untick the box next to the name of the respective layer in the layer window.
You can also adjust the transparency of individual layers using the tool icon in the layer window. There, the opacity can be set in 256 levels for each layer.
Use effects to enhance images or turn them upside down artistically
Foundry
Foundry
Foundry
We’ve all been there. In the heat of the moment, you hold your camera or smartphone at an angle and what should be a beautiful subject ends up looking crooked in the picture.
Instead of having to go through the tedious process of editing the photo and then cutting away the empty areas around the edges of the image, Paint.net takes all the effort out of the equation. To do this, select the Photo field in the top menu bar under Effects and then Straighten.
If Paint.net does not straighten the image by itself, we can help in the small work window (either with numerical values or by dragging with the mouse in the circular window).
The function automatically zooms past the empty spaces that inevitably occur when rotating, but you will also lose sections at the edge of the image just like when manually straightening.
You will find other useful functions under Effects / Photos. There you can, for example, remove red eyes, create an appealing image focus using a vignette, or conceal skin blemishes (soften portrait).
Save time with hotkeys
Foundry
Foundry
Foundry
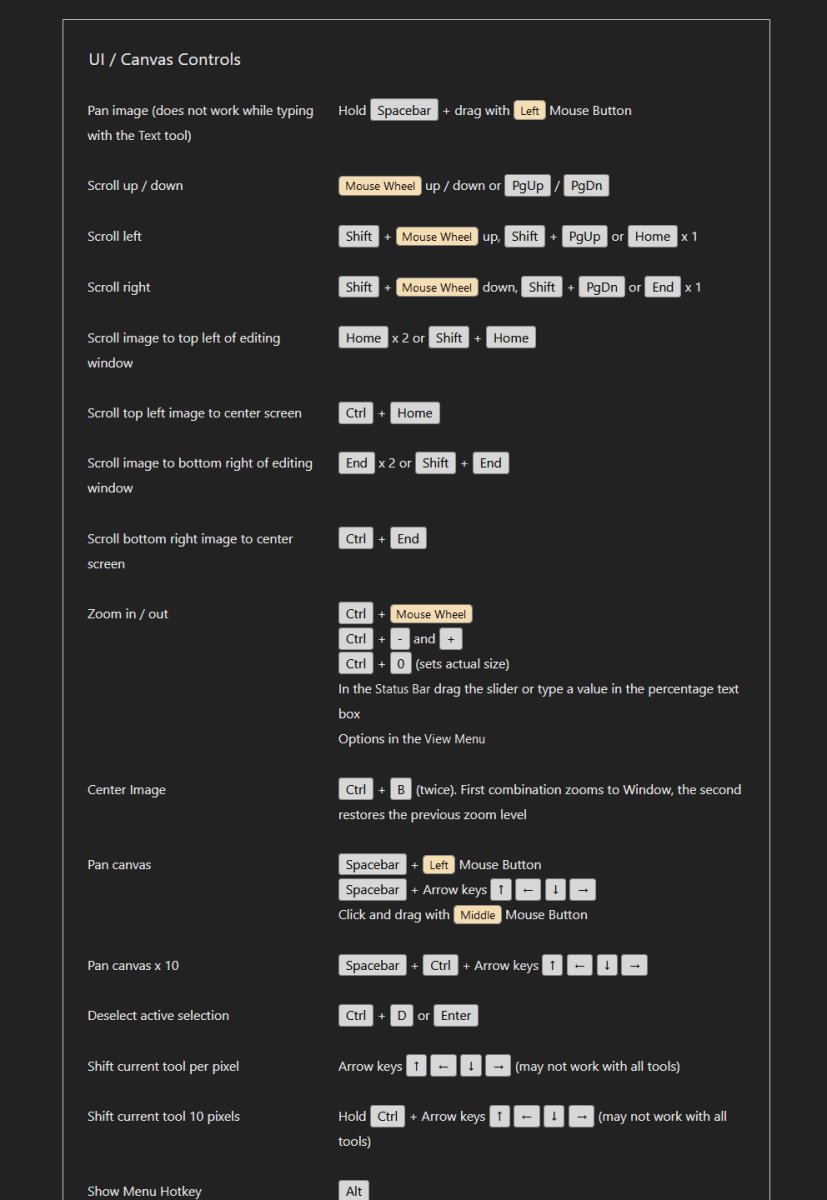
Paint.net provides practical hotkeys for many functions. Instead of having to click around in the same menus and tool windows again and again, we can complete many tasks in no time at all. The best key combinations include:
Key(s) | Function |
Hold the space bar and left-click, move the mouse | Move workspace |
Scroll with mouse wheel | Move workspace up and down |
Shift + scroll with mouse wheel | Move workspace left and right |
Ctrl + C | Copy the selected area |
Ctrl + X | Cut out the selected area |
Ctrl + V | Paste the copied/cut area |
Ctrl + D or Enter | Cancel selection / deselection |
Ctrl + Scroll with mouse wheel | Zoom |
Ctrl + B | Centre image |
F5 | Show/hide tool window |
F6 | Show/hide work steps |
F7 | Show/hide layer window |
F8 | Show/hide colour window |
Ctrl + N | Create new image |
Ctrl + O | Open / select new file |
Ctrl + S | Save image |
Ctrl + Shift + S | Save image as |
Ctrl + P | Print image |
Ctrl + Z | Undo work step |
Ctrl + Y | Restore work step |
Remove selection | Delete selection |