- Регистрация
- 17 Февраль 2018
- Сообщения
- 29 849
- Лучшие ответы
- 0
- Баллы
- 2 093
Offline
You may have already experienced it yourself with a new desktop PC or notebook: After the final installation of Windows 11, the desktop is covered in icons — much of which is bloatware. Common culprits are test versions of security suites and virus scanners as well as programs for image editing, photo books, and cloud services.
get windows 11 pro for cheap
Windows 11 Pro
Price When Reviewed: 69,99 Euro
Best Prices Today: 49,99 € at PC-WELT Software-Shop – Windows 11 Home | 69,99 € at PC-WELT Software-Shop – Windows 11 Pro
The PC manufacturers (OEMs) aren’t thinking of your interests with the software, but rather filling their own bank account. This is because money is paid for each installation of bloatware, and if the customer (i.e. you) takes out a paid subscription to the software, there is a tidy commission thanks to tracking links and traceability.
In addition to bloatware — some also call it crapware — there are a number of other Microsoft programs and apps on your PC that you probably neither know nor need. This is because Windows itself also installs numerous applications.
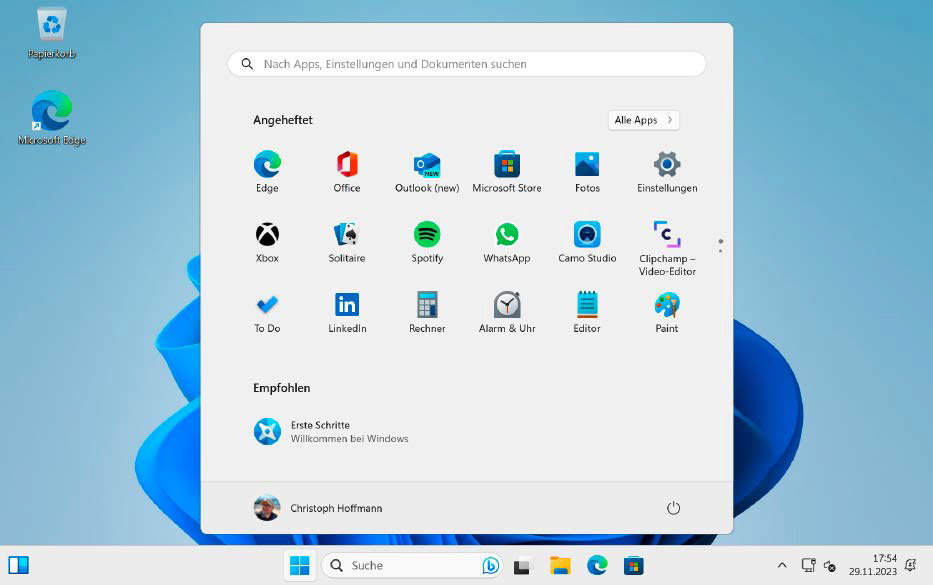
A freshly installed Windows 11 23H2 comes with some applications that you may not even need and can therefore safely uninstall.
IDG
It would be nice to be able to choose which additional software should be installed during the initial installation of Windows 11. But that’s a pipe dream. So you have no choice but to clean out Windows 11 manually or with suitable tools.
Important note: As you are sometimes intervening deeply in the Windows system, you should create a backup before you start uninstalling the apps and programs. A backup minimizes the risk of data loss in the event of a problem. We recommend the free. See our roundup of the best backup software for Windows for recommendations.
As a general rule, be careful and do not uninstall any applications that you are not sure can be safely removed. Some applications may be necessary for the smooth functioning of the operating system.
Why you should remove bloatware
It is not particularly time-consuming or complicated to remove superfluous software under Windows 11. The few minutes that it takes will provide many benefits.
The fewer applications running in the background, the lower the actual resource consumption. This improves the performance of the system.
Bloatware takes up storage space on the hard drive or SSD. By uninstalling these programs, you can free up storage space for important data and applications.
In the past, PC manufacturers have repeatedly used bloatware to unknowingly introduce malware. For example, Lenovo delivered notebooks with the adware Superfish. Pre-installed applications can therefore always pose a security risk. By removing bloatware, you minimize potential attack surfaces.
How to identify annoying bloatware
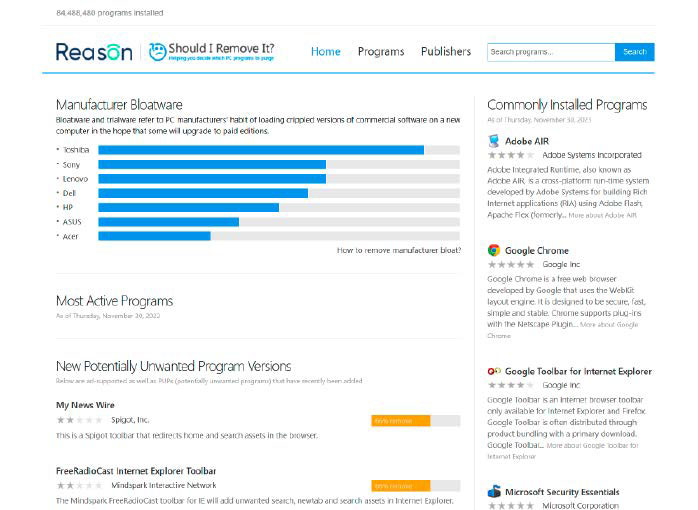
The website Should I Remove It provides comprehensive information on bloatware on PCs from various manufacturers.
IDG
The operators of the Should I Remove It website specialize in finding and removing bloatware. Here you will find comprehensive overviews of bloatware on OEM PCs, i.e. what Toshiba, Sony, Lenovo, Dell, HP, Asus, and Acer include on their Windows devices.
In the case of Toshiba, there are/were more than 30 applications — partly proprietary programs, partly test versions from third-party providers. The instructions provide good explanations and describe in detail how to remove the bloatware using standard Windows tools. A search in the huge and always up-to-date database helps you to identify unknown software.
Powershell tricks: Windows 11 – Debloater Tool
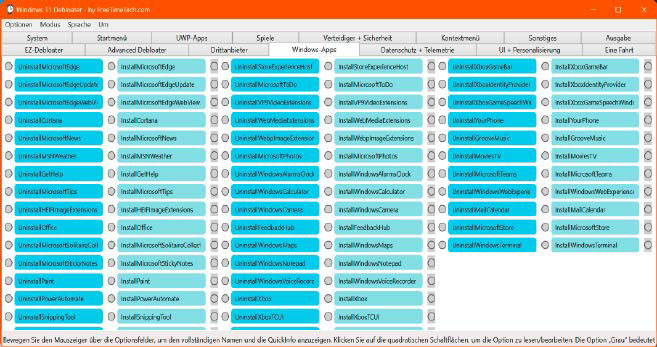
The Windows 11 debloater tool allows deep interventions in the operating system. You should therefore be particularly careful.
IDG
After unpacking the zip archive, you can start immediately without installation by double-clicking on the file “Windows11Debloater.exe.” The interface offers numerous functions in a total of 15 tabs to remove Windows apps and game components, for example. The tool uses ready-made Powershell scripts that are called up via the GUI.
But be careful: It is best to experiment first on a test system in a virtual machine or on a second PC. You should always create a backup of a production system. Many of the deleted components and settings cannot be restored or can only be restored with difficulty.
Remove bloatware with the on-board tools
Before using special uninstall tools, you can try to remove bloatware manually. However, please note that not all pre-installed applications can be easily uninstalled, as some are an integral part of the operating system.
Open the “Settings” app with the key combination Windows + I. Go to “Apps” on the left-hand side of the window and then to “Installed apps” on the right-hand side of the window. The installed programs and (now also apps) are now listed here. Use the filters to limit the display to specific drives and sort the programs by name, date of installation, and size.
Scroll through the list and check which programs you can uninstall. Click on the three dots on the right in the line of the program you no longer want and select the “Uninstall” menu item. Then follow the instructions of the uninstall wizard. Repeat this process for all unwanted applications.
There has recently been a significant change for Windows apps: To install them, you must go to the Microsoft Store, which you can open via the icon in the taskbar or via the Start menu. In the application window, click on “Library” at the bottom left. All installed apps are displayed on the right-hand side of the window — both Windows apps and third-party apps.
Until Windows 11 23H2, apps could also be uninstalled here — Microsoft has now moved this function to the “Settings” app. However, this only applies to third-party apps such as Spotify and Netflix. Windows’ own apps such as Xbox, Mail and Calendar, Windows Photos, and gaming services do not appear here.
For a more comprehensive removal of unwanted programs and apps, you should use special tools that automate many tasks and offer additional functions. You don’t need to spend any money. Even the free versions of well-known tools offer corresponding functions for removing programs and apps. We present three recommended tools.
Remove Windows apps with Powershell commands
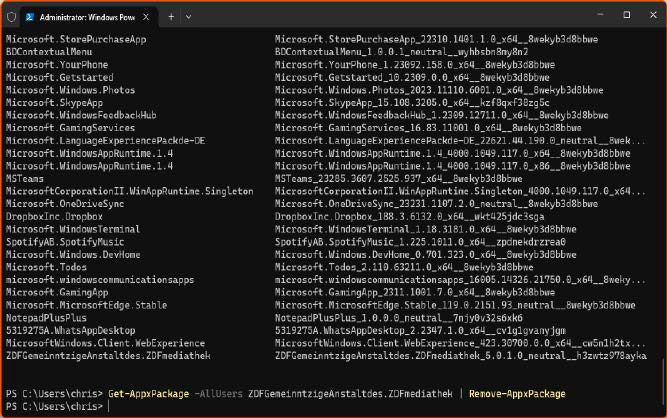
Installed apps can also be removed using appropriate commands in Windows Powershell.
IDG
Experienced Windows users can use Powershell as an administrator to uninstall Windows with the appropriate commands. Powershell is hidden in the Windows Terminal, which you can open by right-clicking on the Windows logo in the taskbar and clicking on “Windows Terminal (as administrator).” A tab for Powershell should be open here. If not, click on the plus sign. For an initial overview, enter the following command and press the Enter key:
Get-AppxPackage -AllUsers | Select Name, PackageFullName
A list of the installed apps is now displayed. In addition to Windows’ own apps, the apps from third-party providers also appear. To uninstall an individual app, enter the following command:
Get-AppxPackage -AllUsers [App-Name] | Remove-AppxPackage
Instead of the placeholder “[App name]”, accept the name of the app as it appears in the list. With the addition “-AllUsers”, you ensure that the app is removed from all user accounts. If you briefly see a blue-colored text, the app has been successfully removed.
These three free tools can help
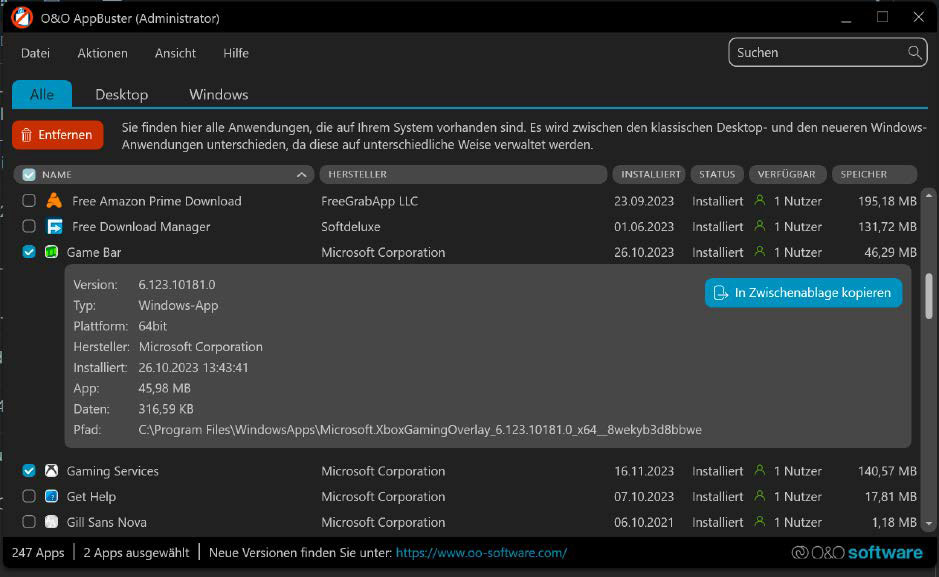
The free Appbuster from O&O Software specializes in removing programs and apps. It can also be used to safely uninstall and reinstall Windows apps.
IDG
Even the free version of the versatile cleaning and optimization tool CCleaner allows you to uninstall programs. Click on “Extras” on the left and then on “Uninstall” at the top right. In the large window area on the right, all installed programs and apps are now displayed with additional information such as publisher, installation date, size, and version.
Click on a list entry and then on the blue “Uninstall” button in the top right-hand corner. Then follow the instructions and finalize the removal of the software. Please note: The “Delete” command (if offered) only removes the list entry, but not the software from the drive.
Removing bloatware is similarly easy with the free tool IObit Uninstaller. Under “Programs” on the left-hand side of the window, you can limit the display according to various criteria. Click on the recycle bin icon at the end of the line on the right-hand side of the window to start uninstalling the selected application.
Unlike CCleaner, the IObit tool uses its own engine for this and works more thoroughly. The IObit Uninstaller also detects remnants of software installations and removes them thanks to deep cleaning.
Further extras: IObit Uninstaller Free can also be used to remove bundled programs, browser extensions, and apps from the PC. In the case of apps, a distinction is made between “Windows apps” and “third-party apps.” With just a few mouse clicks, you can remove unnecessary apps and free up storage space.
The O&O Appbuster is another useful tool. The tool can be started directly without installation and is therefore also suitable for use with USB sticks on other people’s PCs.
After starting the software, the system is analyzed for a few moments. The three tabs “All,” “Desktop,” and “Windows” then provide an overview of the installed applications with details such as manufacturer, installation date, status, and memory used.
You can display a further “System” tab via View > Show system apps. Tick the checkboxes in front of the list entries and click on the red “Remove” button that then appears. Depending on the user configuration, select whether you want to remove the programs only for the currently active user account or for all user accounts.
Click on “OK” to continue. The programs and apps are uninstalled one after the other. To be on the safe side, you should create a Windows restore point. You can find the appropriate command in the “Actions” menu or when uninstalling apps.
O&O Appbuster can also be used to restore some uninstalled apps. The “Status” column will then show “Installable.” Select the app and click on the green “Install” button.
A better life without bloatware
Removing bloatware in Windows 11 can lead to a significant improvement in system performance and user-friendliness. By manually uninstalling and using specialized tools, you can safely and reliably clean up your system. And always remember that you should not unnecessarily bloat Windows 11 yourself.
Our tip: Limit yourself to the applications that best meet your needs and remove software that you have not used for a long time.
Tiny 11: Slimmed-down Windows 11 as a minimal edition
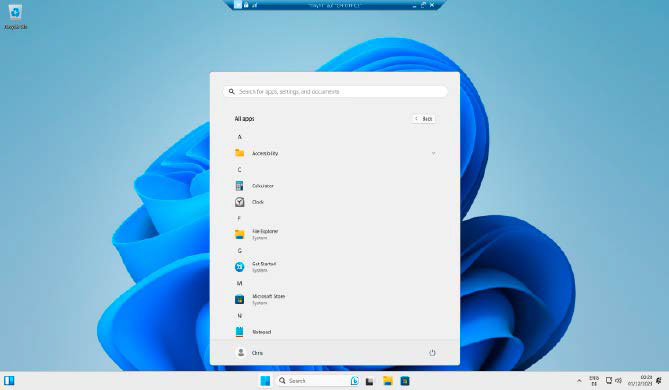
Tiny 11 is a slimmed-down Windows 11 23H2. The setup ISO image was created with the free NTLite tool. Tiny 11 does without many Windows apps.
IDG
If you don’t want to have to slim down Windows 11 afterwards, you should take a look at Tiny 11. This unofficial minimal edition of Windows 11 reduces the system requirements and dispenses with unnecessary ballast.
Windows Tiny 11 was developed by the YouTuber NTDev. This special version of Windows 11 is optimized for devices on which the official edition of the operating system cannot be installed or whose performance is too weak. Tiny 11 offers a quick and simple user interface that only contains the most important functions and applications.
In detail, Tiny 11 requires a 1GHz processor, 2GB of RAM, and 64GB of free storage space. This corresponds to the system requirements of Windows 10. When fully installed, Tiny 11 only requires around 1GB of memory. This is a fraction of what Windows 11 normally requires. This is made possible by the omission of some system components, programs, and Windows apps. For example, the Edge browser and most of the gaming components are missing.
The Tiny 11 developer has not created anything truly revolutionary, but simply created an ISO file for the Windows 11 setup using the free NTLite tool. This can be recognized by the fact that the ISO file contains the NTlite configuration files. You can use these as a template for your own customizations. When you click together your personal Windows installation with NTlite, you delete Windows apps from the installation medium, for example. These are then not copied to the hard drive during a new installation.
Even if you have a little more work to do, it is actually advisable to create a system like Tiny 11 yourself. When downloading from unverifiable sources, there is always the risk of malware being included.
get windows 11 pro for cheap
Windows 11 Pro

Price When Reviewed: 69,99 Euro
Best Prices Today: 49,99 € at PC-WELT Software-Shop – Windows 11 Home | 69,99 € at PC-WELT Software-Shop – Windows 11 Pro
This article was translated from German to English and originally appeared on pcwelt.de.
get windows 11 pro for cheap
Windows 11 Pro

Price When Reviewed: 69,99 Euro
Best Prices Today: 49,99 € at PC-WELT Software-Shop – Windows 11 Home | 69,99 € at PC-WELT Software-Shop – Windows 11 Pro
The PC manufacturers (OEMs) aren’t thinking of your interests with the software, but rather filling their own bank account. This is because money is paid for each installation of bloatware, and if the customer (i.e. you) takes out a paid subscription to the software, there is a tidy commission thanks to tracking links and traceability.
In addition to bloatware — some also call it crapware — there are a number of other Microsoft programs and apps on your PC that you probably neither know nor need. This is because Windows itself also installs numerous applications.

A freshly installed Windows 11 23H2 comes with some applications that you may not even need and can therefore safely uninstall.
IDG
It would be nice to be able to choose which additional software should be installed during the initial installation of Windows 11. But that’s a pipe dream. So you have no choice but to clean out Windows 11 manually or with suitable tools.
Important note: As you are sometimes intervening deeply in the Windows system, you should create a backup before you start uninstalling the apps and programs. A backup minimizes the risk of data loss in the event of a problem. We recommend the free. See our roundup of the best backup software for Windows for recommendations.
As a general rule, be careful and do not uninstall any applications that you are not sure can be safely removed. Some applications may be necessary for the smooth functioning of the operating system.
Why you should remove bloatware
It is not particularly time-consuming or complicated to remove superfluous software under Windows 11. The few minutes that it takes will provide many benefits.
The fewer applications running in the background, the lower the actual resource consumption. This improves the performance of the system.
Bloatware takes up storage space on the hard drive or SSD. By uninstalling these programs, you can free up storage space for important data and applications.
In the past, PC manufacturers have repeatedly used bloatware to unknowingly introduce malware. For example, Lenovo delivered notebooks with the adware Superfish. Pre-installed applications can therefore always pose a security risk. By removing bloatware, you minimize potential attack surfaces.
How to identify annoying bloatware

The website Should I Remove It provides comprehensive information on bloatware on PCs from various manufacturers.
IDG
The operators of the Should I Remove It website specialize in finding and removing bloatware. Here you will find comprehensive overviews of bloatware on OEM PCs, i.e. what Toshiba, Sony, Lenovo, Dell, HP, Asus, and Acer include on their Windows devices.
In the case of Toshiba, there are/were more than 30 applications — partly proprietary programs, partly test versions from third-party providers. The instructions provide good explanations and describe in detail how to remove the bloatware using standard Windows tools. A search in the huge and always up-to-date database helps you to identify unknown software.
Powershell tricks: Windows 11 – Debloater Tool

The Windows 11 debloater tool allows deep interventions in the operating system. You should therefore be particularly careful.
IDG
After unpacking the zip archive, you can start immediately without installation by double-clicking on the file “Windows11Debloater.exe.” The interface offers numerous functions in a total of 15 tabs to remove Windows apps and game components, for example. The tool uses ready-made Powershell scripts that are called up via the GUI.
But be careful: It is best to experiment first on a test system in a virtual machine or on a second PC. You should always create a backup of a production system. Many of the deleted components and settings cannot be restored or can only be restored with difficulty.
Remove bloatware with the on-board tools
Before using special uninstall tools, you can try to remove bloatware manually. However, please note that not all pre-installed applications can be easily uninstalled, as some are an integral part of the operating system.
Open the “Settings” app with the key combination Windows + I. Go to “Apps” on the left-hand side of the window and then to “Installed apps” on the right-hand side of the window. The installed programs and (now also apps) are now listed here. Use the filters to limit the display to specific drives and sort the programs by name, date of installation, and size.
Scroll through the list and check which programs you can uninstall. Click on the three dots on the right in the line of the program you no longer want and select the “Uninstall” menu item. Then follow the instructions of the uninstall wizard. Repeat this process for all unwanted applications.
There has recently been a significant change for Windows apps: To install them, you must go to the Microsoft Store, which you can open via the icon in the taskbar or via the Start menu. In the application window, click on “Library” at the bottom left. All installed apps are displayed on the right-hand side of the window — both Windows apps and third-party apps.
Until Windows 11 23H2, apps could also be uninstalled here — Microsoft has now moved this function to the “Settings” app. However, this only applies to third-party apps such as Spotify and Netflix. Windows’ own apps such as Xbox, Mail and Calendar, Windows Photos, and gaming services do not appear here.
For a more comprehensive removal of unwanted programs and apps, you should use special tools that automate many tasks and offer additional functions. You don’t need to spend any money. Even the free versions of well-known tools offer corresponding functions for removing programs and apps. We present three recommended tools.
Remove Windows apps with Powershell commands

Installed apps can also be removed using appropriate commands in Windows Powershell.
IDG
Experienced Windows users can use Powershell as an administrator to uninstall Windows with the appropriate commands. Powershell is hidden in the Windows Terminal, which you can open by right-clicking on the Windows logo in the taskbar and clicking on “Windows Terminal (as administrator).” A tab for Powershell should be open here. If not, click on the plus sign. For an initial overview, enter the following command and press the Enter key:
Get-AppxPackage -AllUsers | Select Name, PackageFullName
A list of the installed apps is now displayed. In addition to Windows’ own apps, the apps from third-party providers also appear. To uninstall an individual app, enter the following command:
Get-AppxPackage -AllUsers [App-Name] | Remove-AppxPackage
Instead of the placeholder “[App name]”, accept the name of the app as it appears in the list. With the addition “-AllUsers”, you ensure that the app is removed from all user accounts. If you briefly see a blue-colored text, the app has been successfully removed.
These three free tools can help

The free Appbuster from O&O Software specializes in removing programs and apps. It can also be used to safely uninstall and reinstall Windows apps.
IDG
Even the free version of the versatile cleaning and optimization tool CCleaner allows you to uninstall programs. Click on “Extras” on the left and then on “Uninstall” at the top right. In the large window area on the right, all installed programs and apps are now displayed with additional information such as publisher, installation date, size, and version.
Click on a list entry and then on the blue “Uninstall” button in the top right-hand corner. Then follow the instructions and finalize the removal of the software. Please note: The “Delete” command (if offered) only removes the list entry, but not the software from the drive.
Removing bloatware is similarly easy with the free tool IObit Uninstaller. Under “Programs” on the left-hand side of the window, you can limit the display according to various criteria. Click on the recycle bin icon at the end of the line on the right-hand side of the window to start uninstalling the selected application.
Unlike CCleaner, the IObit tool uses its own engine for this and works more thoroughly. The IObit Uninstaller also detects remnants of software installations and removes them thanks to deep cleaning.
Further extras: IObit Uninstaller Free can also be used to remove bundled programs, browser extensions, and apps from the PC. In the case of apps, a distinction is made between “Windows apps” and “third-party apps.” With just a few mouse clicks, you can remove unnecessary apps and free up storage space.
The O&O Appbuster is another useful tool. The tool can be started directly without installation and is therefore also suitable for use with USB sticks on other people’s PCs.
After starting the software, the system is analyzed for a few moments. The three tabs “All,” “Desktop,” and “Windows” then provide an overview of the installed applications with details such as manufacturer, installation date, status, and memory used.
You can display a further “System” tab via View > Show system apps. Tick the checkboxes in front of the list entries and click on the red “Remove” button that then appears. Depending on the user configuration, select whether you want to remove the programs only for the currently active user account or for all user accounts.
Click on “OK” to continue. The programs and apps are uninstalled one after the other. To be on the safe side, you should create a Windows restore point. You can find the appropriate command in the “Actions” menu or when uninstalling apps.
O&O Appbuster can also be used to restore some uninstalled apps. The “Status” column will then show “Installable.” Select the app and click on the green “Install” button.
A better life without bloatware
Removing bloatware in Windows 11 can lead to a significant improvement in system performance and user-friendliness. By manually uninstalling and using specialized tools, you can safely and reliably clean up your system. And always remember that you should not unnecessarily bloat Windows 11 yourself.
Our tip: Limit yourself to the applications that best meet your needs and remove software that you have not used for a long time.
Tiny 11: Slimmed-down Windows 11 as a minimal edition

Tiny 11 is a slimmed-down Windows 11 23H2. The setup ISO image was created with the free NTLite tool. Tiny 11 does without many Windows apps.
IDG
If you don’t want to have to slim down Windows 11 afterwards, you should take a look at Tiny 11. This unofficial minimal edition of Windows 11 reduces the system requirements and dispenses with unnecessary ballast.
Windows Tiny 11 was developed by the YouTuber NTDev. This special version of Windows 11 is optimized for devices on which the official edition of the operating system cannot be installed or whose performance is too weak. Tiny 11 offers a quick and simple user interface that only contains the most important functions and applications.
In detail, Tiny 11 requires a 1GHz processor, 2GB of RAM, and 64GB of free storage space. This corresponds to the system requirements of Windows 10. When fully installed, Tiny 11 only requires around 1GB of memory. This is a fraction of what Windows 11 normally requires. This is made possible by the omission of some system components, programs, and Windows apps. For example, the Edge browser and most of the gaming components are missing.
The Tiny 11 developer has not created anything truly revolutionary, but simply created an ISO file for the Windows 11 setup using the free NTLite tool. This can be recognized by the fact that the ISO file contains the NTlite configuration files. You can use these as a template for your own customizations. When you click together your personal Windows installation with NTlite, you delete Windows apps from the installation medium, for example. These are then not copied to the hard drive during a new installation.
Even if you have a little more work to do, it is actually advisable to create a system like Tiny 11 yourself. When downloading from unverifiable sources, there is always the risk of malware being included.
get windows 11 pro for cheap
Windows 11 Pro

Price When Reviewed: 69,99 Euro
Best Prices Today: 49,99 € at PC-WELT Software-Shop – Windows 11 Home | 69,99 € at PC-WELT Software-Shop – Windows 11 Pro
This article was translated from German to English and originally appeared on pcwelt.de.
