
Created with DALL·E
A step-by-step guide to linking your AI agent with a SQL database — Part 2 of the series
Imagine streamlining your entire business management through a single, user-friendly interface on your phone. While juggling multiple apps is common practice, the future lies in consolidating all your interactions into one chat-based platform, powered by the capabilities of Large Language Models (LLMs).
For small businesses, this approach offers significant advantages. By centralizing data management tasks within a unified chat interface, owners can save time, reduce complexity, and minimize reliance on disparate software tools. The result is a more efficient allocation of resources, allowing a greater focus on core business growth activities.
However, the potential extends beyond just small businesses. The concepts and techniques detailed in this tutorial are adaptable to personal use cases as well. From managing to-do lists and tracking expenses to organizing collections, a chat-based interface provides an intuitive and efficient way to interact with your data.
This article is the second installment in a series that guides you through the process of developing such a software project, from initial concept to practical implementation. Building upon the components introduced in the previous article, we will establish the foundational elements of our application, including:
- Setting up the database schema
- Defining core application functionality
- Structuring the project repository
- Creating Tools capable of interacting with multiple SQL database tables using natural language commands
By the end of this tutorial, you will have a clear understanding of how to architect a chat-based interface that leverages LLMs to simplify data management tasks. Whether you’re a small business owner looking to streamline operations or an individual seeking to optimize personal organization, the principles covered here will provide a solid starting point for your own projects.
Let’s begin by briefly recapping the key takeaways from the previous article to set the context for our current objectives.
Recap
In the first part of this series, we built a prototype agent workflow capable of interacting with tool objects. Our goal was to reduce hallucination in tool arguments generated by the underlying language model, in our case gpt-3.5-turbo.
To achieve this, we implemented two key changes:
- Removed required parameters in the tool schema
- Added a parameter validation step before executing the desired function
By setting all tool parameters to optional and manually checking for missing parameters, we eliminated the urge for the Agent/LLM to hallucinate missing values.
The key objects introduced in the previous article were:
- OpenAiAgent: The main agent workflow class
- Tool: A class representing a tool the agent can use
- ToolResult and StepResult: Classes for encapsulating tool execution results
These components formed the foundation of our agent system, allowing it to process user requests, select appropriate tools, and generate responses.
If you’d like a more detailed explanation or want to know the reasoning behind specific design choices, feel free to check out the previous article: Leverage OpenAI Tool Calling: Building a Reliable AI Agent from Scratch
With this recap in mind, let’s dive into the next phase of our project — integrating database functionality to store and manage business data.
Why Chat Interface for Small Business Data Management
Small businesses often face unique challenges when it comes to data maintenance. Like larger corporations, they need to regularly update and maintain various types of data, such as accounting records, time tracking, invoices, and more. However, the complexity and costs associated with modern ERP (Enterprise Resource Planning) systems can be prohibitive for small businesses. As a result, many resort to using a series of Excel spreadsheets to capture and maintain essential data.
The problem with this approach is that small business owners, who are rarely dedicated solely to administrative tasks, cannot afford to invest significant time and effort into complex administration and control processes. The key is to define lean processes and update data as it arises, minimizing the overhead of data management.
By leveraging the power of Large Language Models and creating a chat interface, we aim to simplify and streamline data management for small businesses. The chatbot will act as a unified interface, allowing users to input data, retrieve information, and perform various tasks using natural language commands. This eliminates the need for navigating multiple spreadsheets or developing complex web applications with multiple forms and dashboards.
Throughout this series, we will gradually enhance the chatbot’s capabilities, adding features such as role-based access control, advanced querying and evaluation, multimodal support, and integration with popular communication platforms like WhatsApp. By the end of the series, you will have a powerful and flexible tool that can adapt to your specific needs, whether you’re running a small business or simply looking to organize your personal life more efficiently.
Let’s get started!
1. Project Structure
To ensure a well-organized and maintainable project, we’ve structured our repository to encapsulate different functionalities and components systematically. Here’s an overview of the repository structure:
project-root/
│
├── database/
│ ├── db.py # Database connection and setup
│ ├── models.py # Database models/schemas
| └── utils.py # Database utilities
│
├── tools/
│ ├── base.py # Base class for tools
│ ├── add.py # Tool for adding data to the database
│ ├── query.py # Tool for querying data from the database
| └── utils.py # Tool utilities
│
├── agents/
│ ├── base.py # Main AI agent logic
│ ├── routing.py # Specialized agent for routing tasks
│ ├── task.py # Tool wrapper for OpenAI subagents
| └── utils.py # agent utilities
│
└── utils.py # Utility functions and classes
This structure allows for a clear separation of concerns, making it easier to develop, maintain, and scale our application.
2. Set up Database
Choosing the right database and ORM (Object-Relational Mapping) library is crucial for our application. For this project, we’ve selected the following frameworks:
- SQLAlchemy: A powerful SQL toolkit and Object-Relational Mapping (ORM) library for Python. It provides a set of tools for interacting with databases using Python objects and classes.
- SQLModel: A library that builds on top of SQLAlchemy and Pydantic, offering a simple and intuitive way to define database models and perform database operations.
By leveraging SQLModel, we can seamlessly integrate with Pydantic and SQLAlchemy, enabling efficient data validation and database operations while eliminating the risk of SQL injection attacks. Moreover, SQLModel allows us to easily build upon our previously designed Tool class, which uses Pydantic models for creating a tool schema.
To ensure the security and robustness of our application, we implement the following measures:
- Role-based access control: Executable operations are bound to user roles, ensuring that users can only perform actions they are authorized to do. This adds an extra layer of security and prevents unauthorized access to sensitive data.
- Prevention of SQL injection attacks: By utilizing ChatGPT’s natural language understanding capabilities, we can validate and sanitize user inputs, mitigating the risk of SQL injection vulnerabilities. SQLModel’s integration with Pydantic helps us enforce strict data validation rules.
With our tech stack decided, let’s dive into setting up the database and defining our models.
2.1 Database Models
To begin building our prototype application, we’ll define the essential database tables and their corresponding SQLModel definitions. For this tutorial, we’ll focus on three core tables:
- Expense
- Revenue
- Customer
These tables will serve as the foundation for our application, allowing us to demonstrate the key functionalities and interactions.
Create a new file named models.py in the database directory and define the tables using SQLModel:
# database\models.py
from typing import Optional
from pydantic import BeforeValidator, model_validator
from sqlmodel import SQLModel, Field
from datetime import time, datetime
from typing_extensions import Annotated
def validate_date(v):
if isinstance(v, datetime):
return v
for f in ["%Y-%m-%d", "%Y-%m-%d %H:%M:%S"]:
try:
return datetime.strptime(v, f)
except ValueError:
pass
raise ValueError("Invalid date format")
def numeric_validator(v):
if isinstance(v, int):
return float(v)
elif isinstance(v, float):
return v
raise ValueError("Value must be a number")
DateFormat = Annotated[datetime, BeforeValidator(validate_date)]
Numeric = Annotated[float, BeforeValidator(numeric_validator)]
class Customer(SQLModel, table=True):
id: Optional[int] = Field(primary_key=True, default=None)
company: str
first_name: str
last_name: str
phone: str
address: str
city: str
zip: str
country: str
class Revenue(SQLModel, table=True):
id: Optional[int] = Field(primary_key=True, default=None)
description: str
net_amount: Numeric
gross_amount: Numeric
tax_rate: Numeric
date: DateFormat
class Expense(SQLModel, table=True):
id: Optional[int] = Field(primary_key=True, default=None)
description: str
net_amount: Numeric = Field(description="The net amount of the expense")
gross_amount: Numeric
tax_rate: Numeric
date: DateFormat
In addition to the standard SQLModel fields, we’ve defined three custom type annotations: DateFormat, TimeFormat, and Numeric. These annotations leverage Pydantic’s BeforeValidator to ensure that the input data is correctly formatted before being stored in the database. The validate_date function handles the conversion of string input to the appropriate datetime. This approach allows us to accept a variety of date formats from the Large Language Model, reducing the need for strict format enforcement in the prompts.
2.2 Database Engine
With our models defined, we need a script to set up the database engine and create the corresponding tables. Let’s create a db.py file in the database directory to handle this:
# database/db.py
from database.models import *
from sqlmodel import SQLModel, create_engine
import os
# local stored database
DATABASE_URL = "sqlite:///app.db"
engine = create_engine(DATABASE_URL, echo=True)
def create_db_and_tables():
SQLModel.metadata.create_all(engine)
create_db_and_tables()
In this script, we import our models and the necessary SQLModel components. We define the DATABASE_URL to point to a local SQLite database file named app.db. We create an engine using create_engine from SQLModel, passing in the DATABASE_URL. The echo=True parameter enables verbose output for debugging purposes.
The create_db_and_tables function uses SQLModel.metadata.create_all to generate the corresponding tables in the database based on our defined models. Finally, we call this function to ensure the database and tables are created when the script is run.
With our database setup complete, we can now focus on updating our Tool class to work seamlessly with SQLModel and enhance our tool schema conversion process.
3. Tool Class
In this section, we’ll discuss the updates made to the Tool class to handle SQLModel instances and improve the validation process. For a more detailed explanation of the Tool class, visit my previous article.
First, we’ve added Type[SQLModel] as a possible type for the model field using the Union type hint. This allows the Tool class to accept both Pydantic's BaseModel and SQLModel's SQLModel as valid model types.
Next, we’ve introduced a new attribute called exclude_keys of type list[str] with a default value of ["id"]. The purpose of this attribute is to specify which keys should be excluded from the validation process and the OpenAI tool schema generation. In this case the default excluded key is id since for data entry creation with SqlModel the id is automatically generated during ingestion.
On top of that we introduced parse_model boolean attribute to our Tool class. Where we can basically decided if the tool function is called with our pydantic/SQLModel or with keyword arguments.
In the validate_input() method, we've added a check to ensure that the keys specified in exclude_keys are not considered as missing keys during the validation process. This is particularly useful for fields like id, which are automatically generated by SQLModel and should not be required in the input.
Similarly, in the openai_tool_schema property, we've added a loop to remove the excluded keys from the generated schema. This ensures that the excluded keys are not included in the schema sent to the OpenAI API. For recap we use the openai_tool_schema property to remove required arguments from our tool schema. This is done to elimenate hallucination by our language model.
Moreover, we changed the import from from pydantic.v1 import BaseModel to from pydantic import BaseModel. Since SQLModel is based on Pydantic v2, we want to be consistent and use Pydantic v2 at this point.
Here’s the updated code for the Tool class:
# tools/base.py
from typing import Type, Callable, Union
from tools.convert import convert_to_openai_tool
from pydantic import BaseModel, ConfigDict
from sqlmodel import SQLModel
class ToolResult(BaseModel):
content: str
success: bool
class Tool(BaseModel):
name: str
model: Union[Type[BaseModel], Type[SQLModel], None]
function: Callable
validate_missing: bool = True
parse_model: bool = False
exclude_keys: list[str] = ["id"]
model_config = ConfigDict(arbitrary_types_allowed=True)
def run(self, **kwargs) -> ToolResult:
if self.validate_missing and model is not None:
missing_values = self.validate_input(**kwargs)
if missing_values:
content = f"Missing values: {', '.join(missing_values)}"
return ToolResult(content=content, success=False)
if self.parse_model:
if hasattr(self.model, "model_validate"):
input_ = self.model.model_validate(kwargs)
else:
input_ = self.model(**kwargs)
result = self.function(input_)
else:
result = self.function(**kwargs)
return ToolResult(content=str(result), success=True)
def validate_input(self, **kwargs):
if not self.validate_missing or not self.model:
return []
model_keys = set(self.model.__annotations__.keys()) - set(self.exclude_keys)
input_keys = set(kwargs.keys())
missing_values = model_keys - input_keys
return list(missing_values)
@property
def openai_tool_schema(self):
schema = convert_to_openai_tool(self.model)
# set function name
schema["function"]["name"] = self.name
# remove required field
if schema["function"]["parameters"].get("required"):
del schema["function"]["parameters"]["required"]
# remove exclude keys
if self.exclude_keys:
for key in self.exclude_keys:
if key in schema["function"]["parameters"]["properties"]:
del schema["function"]["parameters"]["properties"][key]
return schema
These updates to the Tool class provide more flexibility and control over the validation process and schema generation when working with SQLModel instances.
3.1 Custom Tool Schema Conversion
In our Tool class, we create a schema from a Pydantic model using the convert_to_openai_tool function from Langchain. However, this function is based on Pydantic v1, while SQLModel uses Pydantic v2. To make the conversion function compatible, we need to adapt it. Let's create a new script called convert.py:
# tools/convert.py
from langchain_core.utils.function_calling import _rm_titles
from typing import Type, Optional
from langchain_core.utils.json_schema import dereference_refs
from pydantic import BaseModel
def convert_to_openai_tool(
model: Type[BaseModel],
*,
name: Optional[str] = None,
description: Optional[str] = None,
) -> dict:
"""Converts a Pydantic model to a function description for the OpenAI API."""
function = convert_pydantic_to_openai_function(
model, name=name, description=description
)
return {"type": "function", "function": function}
def convert_pydantic_to_openai_function(
model: Type[BaseModel],
*,
name: Optional[str] = None,
description: Optional[str] = None,
rm_titles: bool = True,
) -> dict:
"""Converts a Pydantic model to a function description for the OpenAI API."""
model_schema = model.model_json_schema() if hasattr(model, "model_json_schema") else model.schema()
schema = dereference_refs(model_schema)
schema.pop("definitions", None)
title = schema.pop("title", "")
default_description = schema.pop("description", "")
return {
"name": name or title,
"description": description or default_description,
"parameters": _rm_titles(schema) if rm_titles else schema,
}
This adapted conversion function handles the differences between Pydantic v1 and v2, ensuring that our Tool class can generate compatible schemas for the OpenAI API.
Next, update the import statement in tools/base.py to use the new convert_to_openai_tool function:
# tools/base.py
from typing import Type, Callable, Union
from tools.convert import convert_to_openai_tool
from pydantic import BaseModel
from sqlmodel import SQLModel
#...rest of the code ...
With these changes in place, our Tool class can now handle SQLModel instances and generate schemas that are compatible with the OpenAI API.
Note: If you encounter dependency issues, you may consider removing the Langchain dependency entirely and including the _rm_titles and dereference_refs functions directly in the convert.py file.
By adapting the tool schema conversion process, we’ve ensured that our application can seamlessly work with SQLModel and Pydantic v2, enabling us to leverage the benefits of these libraries while maintaining compatibility with the OpenAI API.
4. Defining SQL Tools
In this section, we will create functions and tools to interact with our database tables using SQL.
4.1 Add Data Tool
First, let’s define a generic function add_row_to_table that takes a SQLModel instance and adds it to the corresponding table:
# tools/add.py
from sqlmodel import SQLModel, Session, select
def add_row_to_table(model_instance: SQLModel):
with Session(engine) as session:
session.add(model_instance)
session.commit()
session.refresh(model_instance)
return f"Successfully added {model_instance} to the table"
Next, we’ll create a model-specific function add_expense_to_table that takes input arguments for an Expense entry and adds it to the table:
# tools/add.py
# ...
def add_expense_to_table(**kwargs):
model_instance = Expense.model_validate(kwargs)
return add_row_to_table(model_instance)
In add_expense_to_table, we use the model_validate() method to trigger the execution of the previously defined BeforeValidator and ensure data validation.
To avoid writing separate functions for each table or SQLModel, we can dynamically generate the functions:
# example usage
def add_entry_to_table(sql_model: Type[SQLModel]):
# return a Callable that takes a SQLModel instance and adds it to the table
return lambda **data: add_row_to_table(model_instance=sql_model.model_validate(data))
add_expense_to_table = add_entry_to_table(Expense)
This approach produces the same result and can be used to dynamically generate functions for all other models.
With these functions in place, we can create tools using our Tool class to add entries to our database tables via the OpenAIAgent:
add_expense_tool = Tool(
name="add_expense_tool",
description="useful for adding expenses to database",
function=add_entry_to_table(Expense),
model=Expense,
validate_missing=True
)
add_revenue_tool = Tool(
name="add_revenue_tool",
description="useful for adding revenue to database",
function=add_entry_to_table(Revenue),
model=Revenue,
validate_missing=True
)
4.2 Query Tool
While we need to create an add_xxx_tool for each table due to varying input schemas, we only need one query tool for querying all tables. To eliminate the risk of SQL injection, we will use the SQL sanitization provided by SQLAlchemy and SQLModel. This means we will query the database through standard Python classes and objects instead of parsing SQL statements directly.
For the queries we want to perform on our tables, we will need the following logic:
- select statement -> SELECT * FROM table_name Arguments: columns, table_name
- where statement -> WHERE column_name = value
Arguments: column, operator, value
In SQLModel, this corresponds to the following sanitized code when we want to find all expenses for coffee in the Expense table:
result = database.execute(
select(Expense).where(Expense.description == "Coffee")
)
To abstract this into a pydantic model:
# tools/query.py
from typing import Union, Literal
from pydantic import BaseModel
class WhereStatement(BaseModel):
column: str
operator: Literal["eq", "gt", "lt", "gte", "lte", "ne", "ct"]
value: str
class QueryConfig(BaseModel):
table_name: str
columns: list[str]
where: list[Union[WhereStatement, None]]
The QueryConfig model allows us to set a table_name, columns, and where statements. The where property accepts a list of WhereStatement models or an empty list (when we want to return all values with no further filtering). A WhereStatement is a submodel defining a column, operator, and value. The Literal type is used to restrict the allowed operators to a predefined set.
Next, we define a function that executes a query based on the QueryConfig:
# tools/query.py
# ...
from database.models import Expense, Revenue, Customer
TABLES = {
"expense": Expense,
"revenue": Revenue,
"customer": Customer
}
def query_data_function(**kwargs) -> ToolResult:
"""Query the database via natural language."""
query_config = QueryConfig.model_validate(kwargs)
if query_config.table_name not in TABLES:
return ToolResult(content=f"Table name {query_config.table_name} not found in database models", success=False)
sql_model = TABLES[query_config.table_name]
# query_config = validate_query_config(query_config, sql_model)
data = sql_query_from_config(query_config, sql_model)
return ToolResult(content=f"Query results: {data}", success=True)
def sql_query_from_config(
query_config: QueryConfig,
sql_model: Type[SQLModel]):
with Session(engine) as session:
selection = []
for column in query_config.select_columns:
if column not in sql_model.__annotations__:
return f"Column {column} not found in model {sql_model.__name__}"
selection.append(getattr(sql_model, column))
statement = select(*selection)
wheres = query_config.where
if wheres:
for where in wheres:
if where.column not in sql_model.__annotations__: # noqa
return (f"Column {where['column']} not found "
"in model {sql_model.__name__}")
elif where.operator == "eq":
statement = statement.where(
getattr(sql_model, where.column) == where.value)
elif where.operator == "gt":
statement = statement.where(
getattr(sql_model, where.column) > where.value)
elif where.operator == "lt":
statement = statement.where(
getattr(sql_model, where.column) < where.value)
elif where.operator == "gte":
statement = statement.where(
getattr(sql_model, where.column) >= where.value)
elif where.operator == "lte":
statement = statement.where(
getattr(sql_model, where.column) <= where.value)
elif where.operator == "ne":
statement = statement.where(
getattr(sql_model, where.column) != where.value)
elif where.operator == "ct":
statement = statement.where(
getattr(sql_model, where.column).contains(where.value))
result = session.exec(statement)
data = result.all()
try:
data = [repr(d) for d in data]
except:
pass
return data
The query_data_function serves as a high-level abstraction for selecting our table model from the TABLES dictionary, while sql_query_from_config is the underlying function for executing the QueryConfig on a table (SQLModel).
In `QueryConfig` you can choose to also define table_names as Literal type, where you hard code the available table names into it. You can even dynamically define the Literal using our TABLES dictionary. By doing so you can reduce false arguments for table_name. For now I have choosen to not use an enum object, because I will provide the agent prompt with context about the currently available tables and there underling ORM schema. I plan to add a tool for our future agent to create new tables on it’s own.While I can dynamically change the agent’s prompt, it won’t be straightforward to change the enum object within `QueryConfig` on our running server.
Finally, we can define our query tool:
query_data_tool = Tool(
name="query_data_tool",
description = "useful to perform queries on a database table",
model=QueryConfig,
function=query_data_function,
)
With these tools in place, our OpenAIAgent is now capable of adding and querying data in our database tables using natural language commands.
5. Configure Agent
To enable successful tool usage for our previously defined tools, the Agent from the previous article will need more context information, especially for using the query tool. The Agent prompt will need to include information about available tables and their schemas. Since we only use two tables at this point, we can include the ORM schema and table names in the system prompt or user prompt. Both options might work well, but I prefer to include variable information like this in the user prompt. By doing so, we can create few-shot examples that demonstrate context-aware tool usage.
To make our Agent capable of handling variable context in the system prompt and user prompt, we can update our Agent class as follows:
import colorama
from colorama import Fore
from openai import OpenAI
from pydantic import BaseModel
from tools.base import Tool, ToolResult
from agents.utils import parse_function_args, run_tool_from_response
class StepResult(BaseModel):
event: str
content: str
success: bool
SYSTEM_MESSAGE = """You are tasked with completing specific objectives and must report the outcomes. At your disposal, you have a variety of tools, each specialized in performing a distinct type of task.
For successful task completion:
Thought: Consider the task at hand and determine which tool is best suited based on its capabilities and the nature of the work. If you can complete the task or answer a question, soley by the information provided you can use the report_tool directly.
Use the report_tool with an instruction detailing the results of your work or to answer a user question.
If you encounter an issue and cannot complete the task:
Use the report_tool to communicate the challenge or reason for the task's incompletion.
You will receive feedback based on the outcomes of each tool's task execution or explanations for any tasks that couldn't be completed. This feedback loop is crucial for addressing and resolving any issues by strategically deploying the available tools.
Return only one tool call at a time.
{context}
"""
class OpenAIAgent:
def __init__(
self,
tools: list[Tool],
client: OpenAI = OpenAI(),
system_message: str = SYSTEM_MESSAGE,
model_name: str = "gpt-3.5-turbo-0125",
max_steps: int = 5,
verbose: bool = True,
examples: list[dict] = None,
context: str = None,
user_context: str = None
):
self.tools = tools
self.client = client
self.model_name = model_name
self.system_message = system_message
self.step_history = []
self.max_steps = max_steps
self.verbose = verbose
self.examples = examples or []
self.context = context or ""
self.user_context = user_context
def to_console(self, tag: str, message: str, color: str = "green"):
if self.verbose:
color_prefix = Fore.__dict__[color.upper()]
print(color_prefix + f"{tag}: {message}{colorama.Style.RESET_ALL}")
def run(self, user_input: str, context: str = None):
openai_tools = [tool.openai_tool_schema for tool in self.tools]
system_message = self.system_message.format(context=context)
if self.user_context:
context = f"{self.user_context}\n{context}" if context else self.user_context
if context:
user_input = f"{context}\n---\n\nUser Message: {user_input}"
self.to_console("START", f"Starting Agent with Input:\n'''{user_input}'''")
self.step_history = [
{"role": "system", "content": system_message},
*self.examples,
{"role": "user", "content": user_input}
]
step_result = None
i = 0
while i < self.max_steps:
step_result = self.run_step(self.step_history, openai_tools)
if step_result.event == "finish":
break
elif step_result.event == "error":
self.to_console(step_result.event, step_result.content, "red")
else:
self.to_console(step_result.event, step_result.content, "yellow")
i += 1
self.to_console("Final Result", step_result.content, "green")
return step_result.content
def run_step(self, messages: list[dict], tools):
# plan the next step
response = self.client.chat.completions.create(
model=self.model_name,
messages=messages,
tools=tools
)
# check for multiple tool calls
if response.choices[0].message.tool_calls and len(response.choices[0].message.tool_calls) > 1:
messages = [
*self.step_history,
{"role": "user", "content": "Error: Please return only one tool call at a time."}
]
return self.run_step(messages, tools)
# add message to history
self.step_history.append(response.choices[0].message)
# check if tool call is present
if not response.choices[0].message.tool_calls:
msg = response.choices[0].message.content
step_result = StepResult(event="Error", content=f"No tool calls were returned.\nMessage: {msg}", success=False)
return step_result
tool_name = response.choices[0].message.tool_calls[0].function.name
tool_kwargs = parse_function_args(response)
# execute the tool call
self.to_console("Tool Call", f"Name: {tool_name}\nArgs: {tool_kwargs}", "magenta")
tool_result = run_tool_from_response(response, tools=self.tools)
tool_result_msg = self.tool_call_message(response, tool_result)
self.step_history.append(tool_result_msg)
if tool_name == "report_tool":
try:
step_result = StepResult(
event="finish",
content=tool_result.content,
success=True
)
except:
print(tool_result)
raise ValueError("Report Tool failed to run.")
return step_result
elif tool_result.success:
step_result = StepResult(
event="tool_result",
content=tool_result.content,
success=True)
else:
step_result = StepResult(
event="error",
content=tool_result.content,
success=False
)
return step_result
def tool_call_message(self, response, tool_result: ToolResult):
tool_call = response.choices[0].message.tool_calls[0]
return {
"tool_call_id": tool_call.id,
"role": "tool",
"name": tool_call.function.name,
"content": tool_result.content,
}
The main changes compared to our previous version:
- We placed a “{context}” placeholder in the default system prompt.
- We added context and user_context as input arguments to __init__().
- We added context to the run() method.
- In run(), we add context to the user message if defined.
- We also added an examples attribute to __init__() that, if set, will be passed between the system and user messages in run().
Now we can define a system context and a user context while initializing our agent. Additionally, we can pass a user context when calling the run method. If context is passed to the run method, it will overwrite the user_context from initialization for that run.
5.1 Providing Context to the Agent
Before we can run our Agent, let’s define a function that generates context information. We want to automatically generate user_context, which we can then pass to the Agent's run function as implemented above. To keep it simple, we want a single line for each table as context information that should include:
- Table name
- Column_name: <type>
After a few attempts with trial and error, the following function will do the job:
# utils.py
from typing import Type
import types
import typing
import sqlalchemy
from pydantic import BaseModel
def orm_model_to_string(input_model_cls: Type[BaseModel]):
"""Get the ORM model string from the input model"""
def process_field(key, value):
if key.startswith("__"):
return None
if isinstance(value, typing._GenericAlias):
if value.__origin__ == sqlalchemy.orm.base.Mapped:
return None
if isinstance(value, typing._AnnotatedAlias): # noqa
return key, value.__origin__
elif isinstance(value, typing._UnionGenericAlias) or isinstance(value, types.UnionType):
return key, value.__args__[0]
return key, value
fields = dict(filter(None, (process_field(k, v) for k, v in input_model_cls.__annotations__.items())))
return ", ".join([f"{k} = <{v.__name__}>" for k, v in fields.items()])
def generate_context(*table_models) -> str:
context_str = "You can access the following tables in database:\n"
for table in table_models:
context_str += f" - {table.__name__}: {orm_model_to_string(table)}\n"
return context_str
If we pass Expense and Revenue to generate_context(), we should get the following context string:
We want the Agent to know the current date and day of the week, so we can reference the correct date. So let’s add some date parsing functions to our utils class:
# utils.py
from datetime import datetime
#... rest of utils.py ...
def weekday_by_date(date: datetime):
days = ["Monday", "Tuesday", "Wednesday", "Thursday", "Friday", "Saturday", "Sunday"]
return days[date.weekday()]
def date_to_string(date: datetime):
return f"{weekday_by_date(date)} {parse_date(date)}"
def parse_date(date: datetime):
return date.strftime("%Y-%m-%d")
Now let’s create the context for a query agent
# utils.py
# ...
def generate_query_context(*table_models) -> str:
today = f"Today is {date_to_string(datetime.now())}"
context_str = "You can access the following tables in database:\n"
for table in table_models:
context_str += f" - {table.__name__}: {orm_model_to_string(table)}\n"
return f"{today}\n{context_str}"
from database.models import Expense, Revenue
print(generate_query_context(Expense, Revenue))
Today is Sunday 2024-04-21
You can access the following tables in database:
- Expense: id = <int>, description = <str>, net_amount = <float>, gross_amount = <float>, tax_rate = <float>, date = <datetime>
- Revenue: id = <int>, description = <str>, net_amount = <float>, gross_amount = <float>, tax_rate = <float>, date = <datetime>
5.2 Routing Agent
As we add more tools, the complexity of our setup may start to limit the usability of cheaper models like “gpt-3.5-turbo”. In the next article, we might consider switching to Anthropic Claude, since their newly released tool-use API feature seems promising, even for the more affordable HAIKU model, in handling multiple tools simultaneously. However, for now, we will continue using OpenAI’s GPT models.
When developing for personal use and before creating production-ready applications, I find it useful to optimize the workflow for smaller models, such as gpt-3.5-turbo in this case. This approach forces us to create a streamlined processing logic and prompting system. While we may not achieve 100% reliability without using the most powerful model, we will be able to catch flaws and identify unclear instructions. If your application works in 9 out of 10 cases with a smaller model, you will have a production-ready logic that will perform even better with a stronger model.
To make multi-tool handling reliable with gpt-3.5-turbo we will implement a routing agent whose sole purpose is to route the user query to the appropriate task agent. This allows us to separate execution logic and reduce complexity. Each agent will have a limited scope, enabling us to separate access roles and operations in the future. I have observed that even with gpt-4, there are instances where the agent does not know when its task is finished.
By introducing a routing agent, we can break down the problem into smaller, more manageable parts. The routing agent will be responsible for understanding the user’s intent and directing the query to the relevant task agent. This approach not only simplifies the individual agents’ responsibilities but also makes the system more modular and easier to maintain.
Furthermore, separating the execution logic and complexity will pave the way for implementing role-based access control in the future. Each task agent can be assigned specific permissions and access levels, ensuring that sensitive operations are only performed by authorized agents.
While the routing agent adds an extra step in the process, it ultimately leads to a more robust and scalable system. By optimizing for smaller models and focusing on clear, concise prompts, we can create a solid foundation that will perform even better when we switch to more powerful models like Claude Opus or GPT-4.
Let’s have a look on the implementation of the routing agent
# agents/routing.py
from openai import OpenAI
import colorama
from agents.task_agent import TaskAgent
from agents.utils import parse_function_args
SYSTEM_MESSAGE = """You are a helpful assistant.
Role: You are an AI Assistant designed to serve as the primary point of contact for users interacting through a chat interface.
Your primary role is to understand users' requests related to database operations and route these requests to the appropriate tool.
Capabilities:
You have access to a variety of tools designed for Create, Read operations on a set of predefined tables in a database.
Tables:
{table_names}
"""
NOTES = """Important Notes:
Always confirm the completion of the requested operation with the user.
Maintain user privacy and data security throughout the interaction.
If a request is ambiguous or lacks specific details, ask follow-up questions to clarify the user's needs."""
class RoutingAgent:
def __init__(
self,
tools: list[TaskAgent] = None,
client: OpenAI = OpenAI(),
system_message: str = SYSTEM_MESSAGE,
model_name: str = "gpt-3.5-turbo-0125",
max_steps: int = 5,
verbose: bool = True,
prompt_extra: dict = None,
examples: list[dict] = None,
context: str = None
):
self.tools = tools or ROUTING_AGENTS
self.client = client
self.model_name = model_name
self.system_message = system_message
self.memory = []
self.step_history = []
self.max_steps = max_steps
self.verbose = verbose
self.prompt_extra = prompt_extra or PROMPT_EXTRA
self.examples = self.load_examples(examples)
self.context = context or ""
def load_examples(self, examples: list[dict] = None):
examples = examples or []
for agent in self.tools:
examples.extend(agent.routing_example)
return examples
def run(self, user_input: str, employee_id: int = None, **kwargs):
context = create_routing_agent_context(employee_id)
if context:
user_input_with_context = f"{context}\n---\n\nUser Message: {user_input}"
else:
user_input_with_context = user_input
self.to_console("START", f"Starting Task Agent with Input:\n'''{user_input_with_context}'''")
partial_variables = {**self.prompt_extra, "context": context}
system_message = self.system_message.format(**partial_variables)
messages = [
{"role": "system", "content": system_message},
*self.examples,
{"role": "user", "content": user_input}
]
tools = [tool.openai_tool_schema for tool in self.tools]
response = self.client.chat.completions.create(
model=self.model_name,
messages=messages,
tools=tools
)
self.step_history.append(response.choices[0].message)
self.to_console("RESPONSE", response.choices[0].message.content, color="blue")
tool_kwargs = parse_function_args(response)
tool_name = response.choices[0].message.tool_calls[0].function.name
self.to_console("Tool Name", tool_name)
self.to_console("Tool Args", tool_kwargs)
agent = self.prepare_agent(tool_name, tool_kwargs)
return agent.run(user_input)
def prepare_agent(self, tool_name, tool_kwargs):
for agent in self.tools:
if agent.name == tool_name:
input_kwargs = agent.arg_model.model_validate(tool_kwargs)
return agent.load_agent(**input_kwargs.dict())
raise ValueError(f"Agent {tool_name} not found")
def to_console(self, tag: str, message: str, color: str = "green"):
if self.verbose:
color_prefix = colorama.Fore.__dict__[color.upper()]
print(color_prefix + f"{tag}: {message}{colorama.Style.RESET_ALL}")
The biggest differences to our OpenAIAgent are:
- No open loop: we want the routing agent to route user’s queries to the appropriate agent. So instead of creating an open loop we select the desired agent via tool calling and pass the user query to it. The routing Agent should not do any other task or follow-up question.
- Agents as Tools: Instead of calling a tool the routing agent setup a subagent. So our previously defined OpenAIAgentis now a tool within our routing agent.
To use our OpenAIAgentas a tool, we need to introduce some sort of tool class dedicated for Agents. We want to define a name and description for each agent and automate the initialization process. Therefore, we define our last class for this tutorial theTaskAgent.
The TaskAgent class serves similar functionality as the Tool class. We define a name a description and an input model which we call arg_model.
from typing import Type, Callable, Optional
from agents.base import OpenAIAgent
from tools.base import Tool
from tools.report_tool import report_tool
from pydantic import BaseModel, ConfigDict, Field
from tools.utils import convert_to_openai_tool
SYSTEM_MESSAGE = """You are tasked with completing specific objectives and must report the outcomes. At your disposal, you have a variety of tools, each specialized in performing a distinct type of task.
For successful task completion:
Thought: Consider the task at hand and determine which tool is best suited based on its capabilities and the nature of the work.
If you can complete the task or answer a question, soley by the information provided you can use the report_tool directly.
Use the report_tool with an instruction detailing the results of your work or to answer a user question.
If you encounter an issue and cannot complete the task:
Use the report_tool to communicate the challenge or reason for the task's incompletion.
You will receive feedback based on the outcomes of each tool's task execution or explanations for any tasks that couldn't be completed. This feedback loop is crucial for addressing and resolving any issues by strategically deploying the available tools.
On error: If information are missing consider if you can deduce or calculate the missing information and repeat the tool call with more arguments.
Use the information provided by the user to deduct the correct tool arguments.
Before using a tool think about the arguments and explain each input argument used in the tool.
Return only one tool call at a time! Explain your thoughts!
{context}
"""
class EmptyArgModel(BaseModel):
pass
class TaskAgent(BaseModel):
name: str
description: str
arg_model: Type[BaseModel] = EmptyArgModel
create_context: Callable = None
create_user_context: Callable = None
tool_loader: Callable = None
system_message: str = SYSTEM_MESSAGE
tools: list[Tool]
examples: list[dict] = None
routing_example: list[dict] = Field(default_factory=list)
model_config = ConfigDict(arbitrary_types_allowed=True)
def load_agent(self, **kwargs) -> OpenAIAgent:
input_kwargs = self.arg_model(**kwargs)
kwargs = input_kwargs.dict()
context = self.create_context(**kwargs) if self.create_context else None
user_context = self.create_user_context(**kwargs) if self.create_user_context else None
if self.tool_loader:
self.tools.extend(self.tool_loader(**kwargs))
if report_tool not in self.tools:
self.tools.append(report_tool)
return OpenAIAgent(
tools=self.tools,
context=context,
user_context=user_context,
system_message=self.system_message,
examples=self.examples,
)
@property
def openai_tool_schema(self):
return convert_to_openai_tool(self.arg_model, name=self.name, description=self.description)
Additionally, we added all relevant attributes to our TaskAgent class, which we need for an underlying specialized OpenAIAgent :
- create_context / create_user_context: Here we can pass a function to create the context or user context like in section 5.1
- tool_loader is another callable function which we may need for setting up the underlying agent. As in our dynamic tool building previously explained, we may need tools that are dynamically built based on the user input/routing agent input.
- system_message is the agent’s system prompt. In our example, it will be the default system prompt for every agent, but it can be an optimized version for each specialized agent.
- tools: Predefined tools the agent should use.
- examples: Examples to include in subagent’s message history
- routing_example: Examples to include in routing agent’s message history
Moreover, we have an emty BaseModel called EmptyArgModel which is default arg_model in our TaskAgent
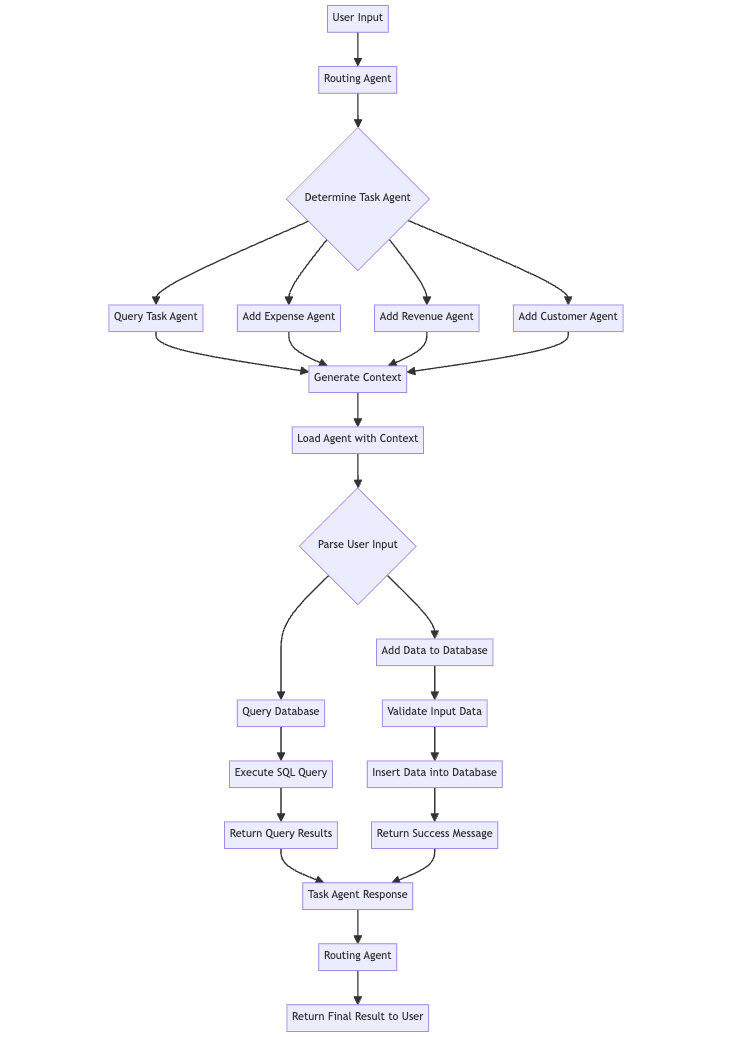
Created by the author mermaid
Let’s see if it all plays together!
Run Agent
Now, it’s time to test if our routing and subagents work well together. As we introduced examples as a paremeter we can use several test runs to inspect major flaws in the execution and define example usage for each sub agent.
Let’s define our subagents first:
from database.models import Expense, Revenue, Customer
from agents.task import TaskAgent
from utils import generate_query_context
from tools.base import Tool
from tools.query import query_data_tool
from tools.add import add_entry_to_table
query_task_agent = TaskAgent(
name="query_agent",
description="An agent that can perform queries on multiple data sources",
create_user_context=lambda: generate_query_context(Expense, Revenue, Customer),
tools=[query_data_tool]
)
add_expense_agent = TaskAgent(
name="add_expense_agent",
description="An agent that can add an expense to the database",
create_user_context=lambda: generate_query_context(Expense) + "\nRemarks: The tax rate is 0.19. The user provide the net amount you need to calculate the gross amount.",
tools=[
Tool(
name="add_expense",
description="Add an expense to the database",
function=add_entry_to_table(Expense),
model=Expense
)
]
)
add_revenue_agent = TaskAgent(
name="add_revenue_agent",
description="An agent that can add a revenue entry to the database",
create_user_context=lambda: generate_query_context(Revenue) + "\nRemarks: The tax rate is 0.19. The user provide the gross_amount you should use the tax rate to calculate the net_amount.",
tools=[
Tool(
name="add_revenue",
description="Add a revenue entry to the database",
function=add_entry_to_table(Revenue),
model=Revenue
)
]
)
add_customer_agent = TaskAgent(
name="add_customer_agent",
description="An agent that can add a customer to the database",
create_user_context=lambda: generate_query_context(Customer),
tools=[
Tool(
name="add_customer",
description="Add a customer to the database",
function=add_entry_to_table(Customer),
model=Customer
)
]
)
As you can see we added some remarks as string to create_user_context for revenue and expense agents. We want the sub agent to handle tax rates and calculate the net or gross amount automatically to test the reasoning capabilites of our sub agent.
from agents.routing import RoutingAgent
routing_agent = RoutingAgent(
tools=[
query_task_agent,
add_expense_agent,
add_revenue_agent,
add_customer_agent
]
)
routing_agent.run("I have spent 5 € on a office stuff. Last Thursday")
START: Starting Routing Agent with Input:
I have spent 5 € on a office stuff. Last Thursday
Tool Name: add_expense_agent
Tool Args: {}
START: Starting Task Agent with Input:
"""Today is Sunday 2024-04-21
You can access the following tables in database:
- expense: id = <int>, description = <str>, net_amount = <float>, gross_amount = <float>, tax_rate = <float>, date = <datetime>
Remarks: The tax rate is 0.19. The user provide the net amount you need to calculate the gross amount.
---
User Message: I have spent 5 € on a office stuff. Last Thursday"""
Tool Call: Name: add_expense
Args: {'description': 'office stuff', 'net_amount': 5, 'tax_rate': 0.19, 'date': '2024-04-18'}
Message: None
error: Missing values: gross_amount
Tool Call: Name: add_expense
Args: {'description': 'office stuff', 'net_amount': 5, 'tax_rate': 0.19, 'date': '2024-04-18', 'gross_amount': 5.95}
Message: None
tool_result: Successfully added net_amount=5.0 id=2 gross_amount=5.95 description='office stuff' date=datetime.datetime(2024, 4, 18, 0, 0) tax_rate=0.19 to the table
Error: No tool calls were returned.
Message: I have successfully added the expense for office stuff with a net amount of 5€, calculated the gross amount, and recorded it in the database.
Tool Call: Name: report_tool
Args: {'report': 'Expense for office stuff with a net amount of 5€ has been successfully added. Gross amount calculated as 5.95€.'}
Message: None
Final Result: Expense for office stuff with a net amount of 5€ has been successfully added. Gross amount calculated as 5.95€.
Now let’s add a revenue:
routing_agent.run("Two weeks ago on Saturday we had a revenue of 1000 € in the shop")
START: Starting Routing Agent with Input:
Two weeks ago on Saturday we had a revenue of 1000 € in the shop
Tool Name: add_revenue_agent
Tool Args: {}
START: Starting Task Agent with Input:
"""Today is Sunday 2024-04-21
You can access the following tables in database:
- revenue: id = <int>, description = <str>, net_amount = <float>, gross_amount = <float>, tax_rate = <float>, date = <datetime>
Remarks: The tax rate is 0.19. The user provide the gross_amount you should use the tax rate to calculate the net_amount.
---
User Message: Two weeks ago on Saturday we had a revenue of 1000 € in the shop"""
Tool Call: Name: add_revenue
Args: {'description': 'Revenue from the shop', 'gross_amount': 1000, 'tax_rate': 0.19, 'date': '2024-04-06'}
Message: None
error: Missing values: net_amount
Tool Call: Name: add_revenue
Args: {'description': 'Revenue from the shop', 'gross_amount': 1000, 'tax_rate': 0.19, 'date': '2024-04-06', 'net_amount': 840.34}
Message: None
tool_result: Successfully added net_amount=840.34 gross_amount=1000.0 tax_rate=0.19 description='Revenue from the shop' id=1 date=datetime.datetime(2024, 4, 6, 0, 0) to the table
Error: No tool calls were returned.
Message: The revenue entry for the shop on April 6, 2024, with a gross amount of 1000€ has been successfully added to the database. The calculated net amount after applying the tax rate is 840.34€.
Tool Call: Name: report_tool
Args: {'report': 'completed'}
Message: None
Final Result: completed
And for the last test let’s try to query the revenue that created from database:
routing_agent.run("How much revenue did we made this month?")
START: Starting Routing Agent with Input:
How much revenue did we made this month?
Tool Name: query_agent
Tool Args: {}
START: Starting Agent with Input:
"""Today is Sunday 2024-04-21
You can access the following tables in database:
- expense: id = <int>, description = <str>, net_amount = <float>, gross_amount = <float>, tax_rate = <float>, date = <datetime>
- revenue: id = <int>, description = <str>, net_amount = <float>, gross_amount = <float>, tax_rate = <float>, date = <datetime>
- customer: id = <int>, company_name = <str>, first_name = <str>, last_name = <str>, phone = <str>, address = <str>, city = <str>, zip = <str>, country = <str>
---
User Message: How much revenue did we made this month?"""
Tool Call: Name: query_data_tool
Args: {'table_name': 'revenue', 'select_columns': ['gross_amount'], 'where': [{'column': 'date', 'operator': 'gte', 'value': '2024-04-01'}, {'column': 'date', 'operator': 'lte', 'value': '2024-04-30'}]}
Message: None
tool_result: content="Query results: ['1000.0']" success=True
Error: No tool calls were returned.
Message: The revenue made this month is $1000.00.
Tool Call: Name: report_tool
Args: {'report': 'The revenue made this month is $1000.00.'}
Message: None
Final Result: The revenue made this month is $1000.00.
All tools worked as expected. The Routing Agent worked perfectly. For theTask Agent I had to update the prompt several times.
I would recommend to add some example tool calls to each task agent when not working with state-of-the-art models like gpt-4. In general I would recommend to tackle flaws with examples and more intuitive designs instead of prompt engineering. Reapting flaws are indicators for not straightforward designs. For example when the agent struggles with calculating the gross or net amount just add a ‘calculate_gross_amount_tool’ or ‘calculate_net_amount_tool’. GPT-4 on the other hand would handle use cases like that without hestitating.
Conclusion
In this article, we’ve taken a significant step forward in our journey to create a comprehensive chat-based interface for managing small businesses using Large Language Models.
By setting up our database schema, defining core functionalities, and structuring our project repository, we’ve laid a solid foundation for the development of our application.
We started by designing our database models using SQLModel, which allowed us to seamlessly integrate with Pydantic and SQLAlchemy. This approach ensures efficient data validation and database operations while minimizing the risk of SQL injection attacks.
We then proceeded to update our Tool class to handle SQLModel instances and improve the validation process. Next, we implemented SQL tools for adding data to our database tables and querying data using natural language commands. By leveraging the power of SQLModel and Pydantic, we were able to create a robust and flexible system that can handle a wide range of user inputs and generate accurate SQL queries.
We configured our OpenAIAgent to provide context-aware tool usage by updating the agent class to handle variable context in the system prompt and user prompt. This allows our agent to understand the available tables and their schemas, enabling more accurate and efficient tool usage. While we’ve made significant progress, there’s still much more to explore and implement.
To further enhance our chatbot, we introduced the TaskAgent class, which serves a similar functionality as the Tool class. The TaskAgent allows us to define a name, description, and input model for each agent, automating the initialization process.
Finally, we tested our routing and subagents by defining subagents for querying data, adding expenses, adding revenue. We demonstrated how the agents handle tax rates and calculate net or gross amounts automatically, showcasing the reasoning capabilities of our subagents.
Next steps
In the next part of this series, we’ll focus on enhancing our agent’s capabilities by adding support for more tools and potentially testing Claude as a new default language model. We’ll also explore integrating our application with popular communication platforms (WhatsApp) to make it even more accessible and user-friendly.
As we continue to refine and expand our application, the possibilities are endless. By leveraging the power of Large Language Models and creating intuitive chat-based interfaces, we can revolutionize the way small businesses manage their data and streamline their operations. Stay tuned for the next installment in this exciting series!
Source Code
Additionally, the entire source code for the projects covered is available on GitHub. You can access it at https://github.com/elokus/ArticleDemo2.
Building an AI-Powered Business Manager was originally published in Towards Data Science on Medium, where people are continuing the conversation by highlighting and responding to this story.