How to Roundtrip a Project Between Avid Media Composer and DaVinci Resolve
Three pieces of metadata from each master clip are important for roundtripping from Blackmagic Design DaVinci Resolve to Avid Media Composer. Just three. Learn where they are, manage them consistently, and you will be able to use this metadata to manage ‘essence’ (the actual media) in your Media Composer-Resolve roundtrips with perfect, painless control:
As you scan down this article, what follows may look complicated. That is only because, instead of skipping things that other tutorials think you SHOULD know, I want you to see everything you NEED to know.
This really is a very simple approach using just those three metadata columns per master clip. Pay attention to those three columns, and you will have all of the power to make the Avid Relink Command do exactly what you want it to.
Note: the path I am illustrating is Avid Media Composer v8.3.1 to Blackmagic Design DaVinci Resolve v11.3.1, and back to Media Composer v8.3.1.
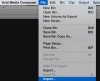
In Avid Media Composer
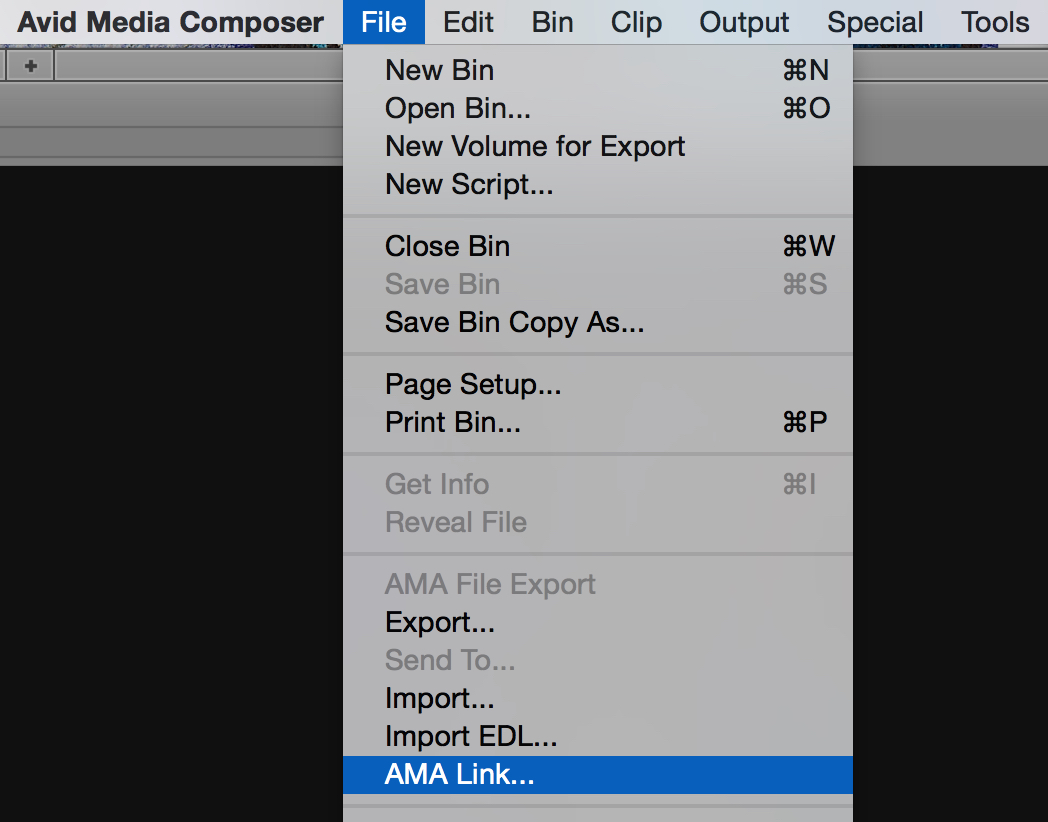
Step 1
Go to the ‘File Menu’ and choose the ‘AMA Link…’ command. Select a source file on the storage device. A master clip is created in the Avid Bin.

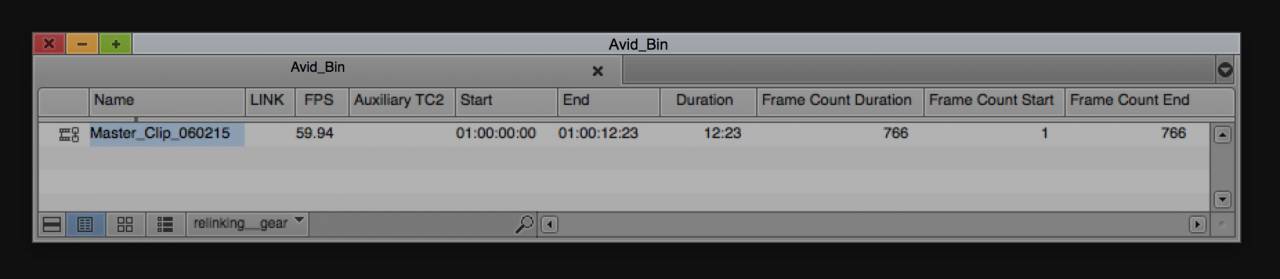
Step 2
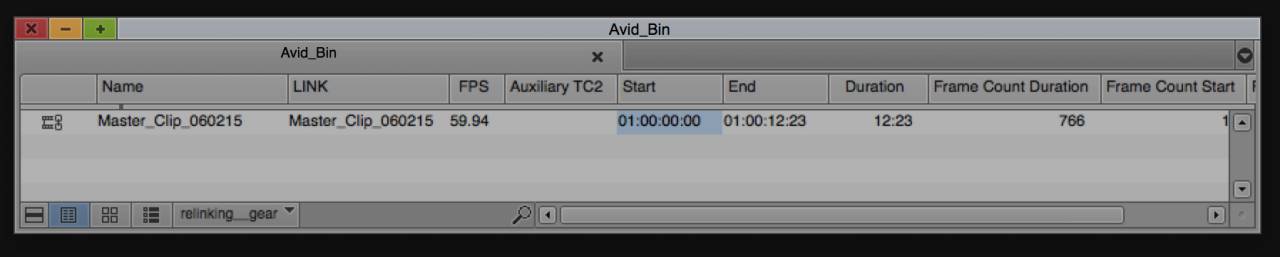
In the Avid Bin, click on the column heading titled ‘Name’. The metadata in the ‘Name’ column becomes selected for the master clip.

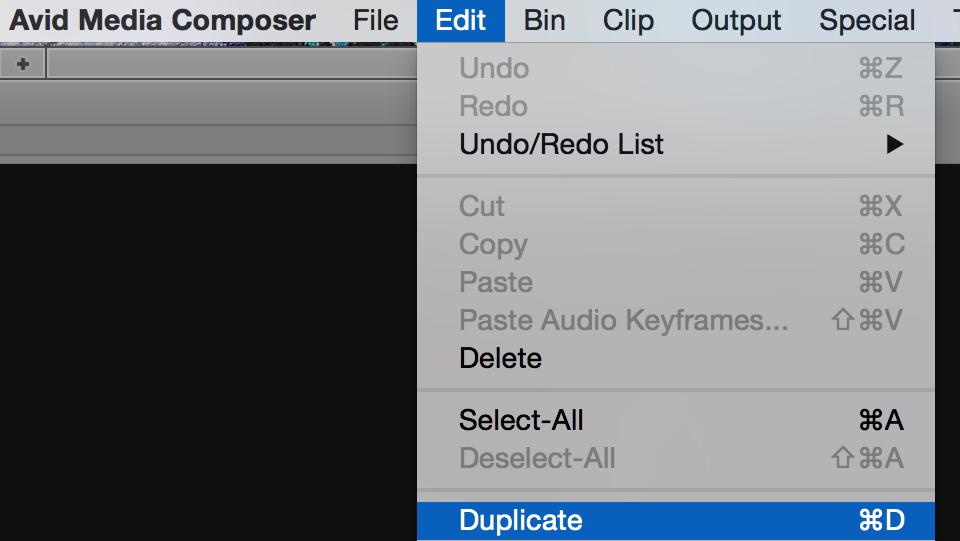
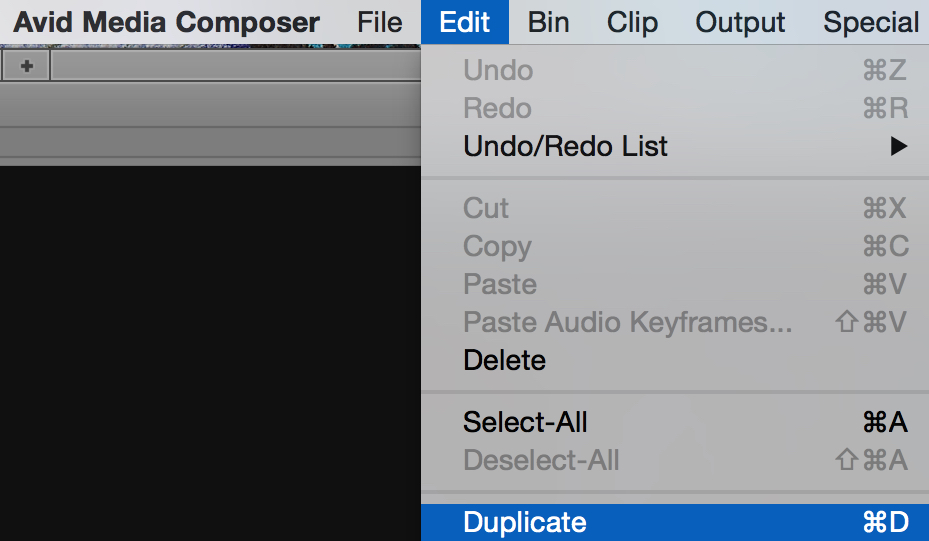
Step 3
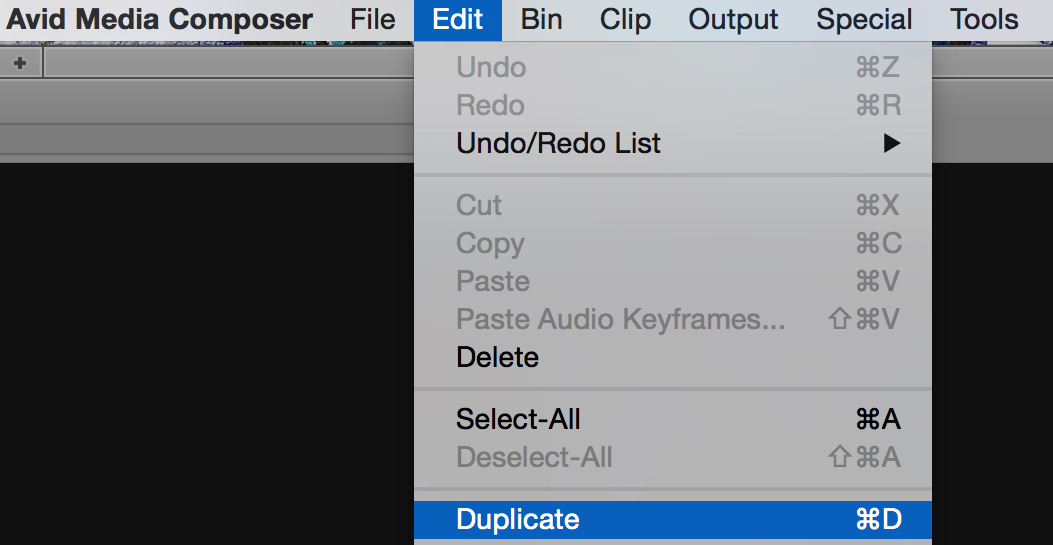
While the ‘Name’ column is selected, go to the ‘Edit Menu’ and choose the ‘Duplicate’ command. The ‘Select’ window appears.

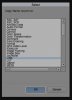
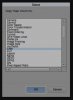
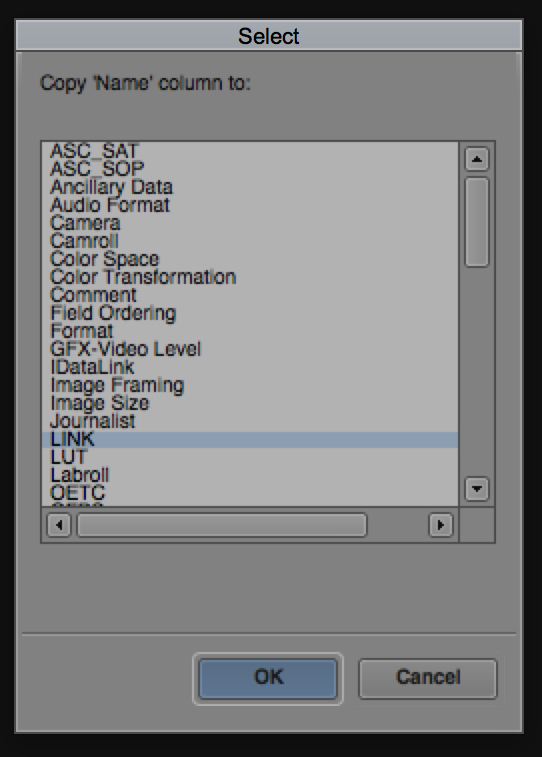
Step 4
the ‘Select’ window, from the displayed list, click on the ‘LINK’ heading to select it. Click the ‘OK’ button at the bottom of the ‘Select’ window.
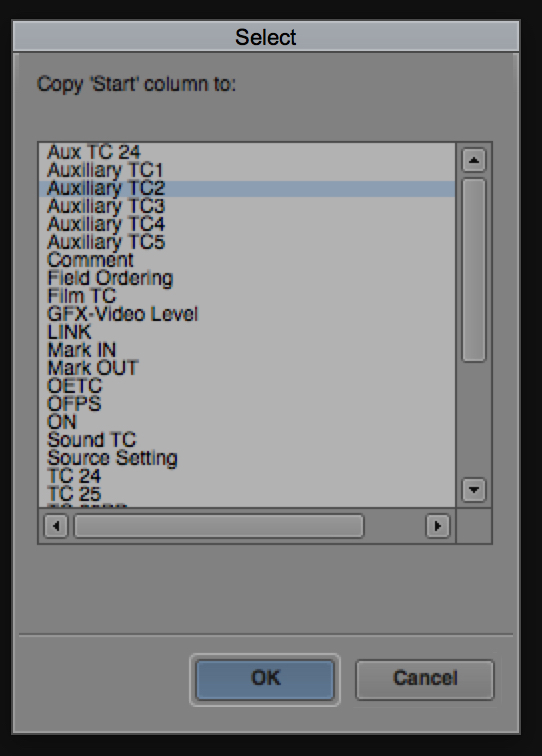
Step 5
In the Avid Bin, click on the column heading titled ‘Start’. The metadata in the ‘Start’ column becomes selected for the master clip.

Step 6
While the ‘Start’ column is selected, go to the ‘Edit Menu’ and choose the ‘Duplicate’ command. The ‘Select’ window appears.

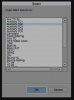
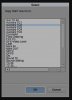
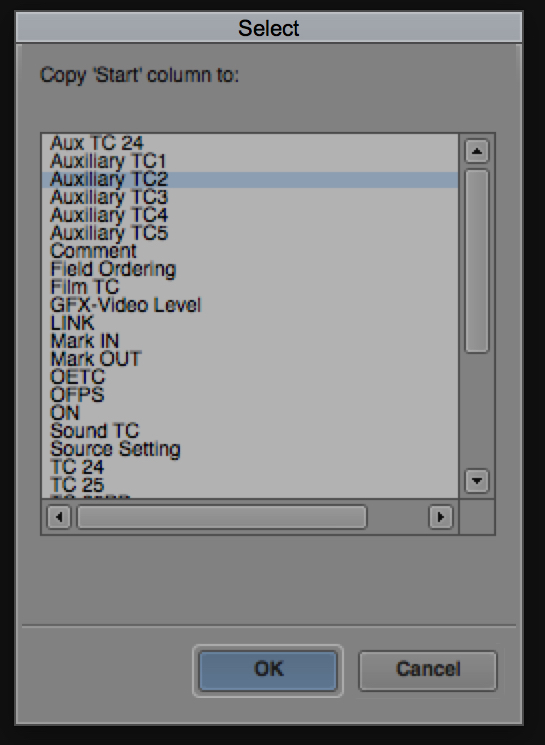
Step 7
In the ‘Select’ window, from the displayed list, click on the ‘Auxiliary TC2’ heading to select it. Click the ‘OK’ button at the bottom of the ‘Select’ window.
Now the master clip is ready to be cut into a sequence. Cut the master clip into a sequence.
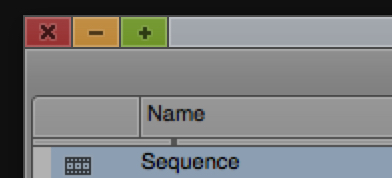
Step 8
Select the Sequence in the Avid Bin.

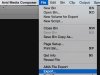
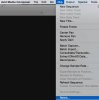
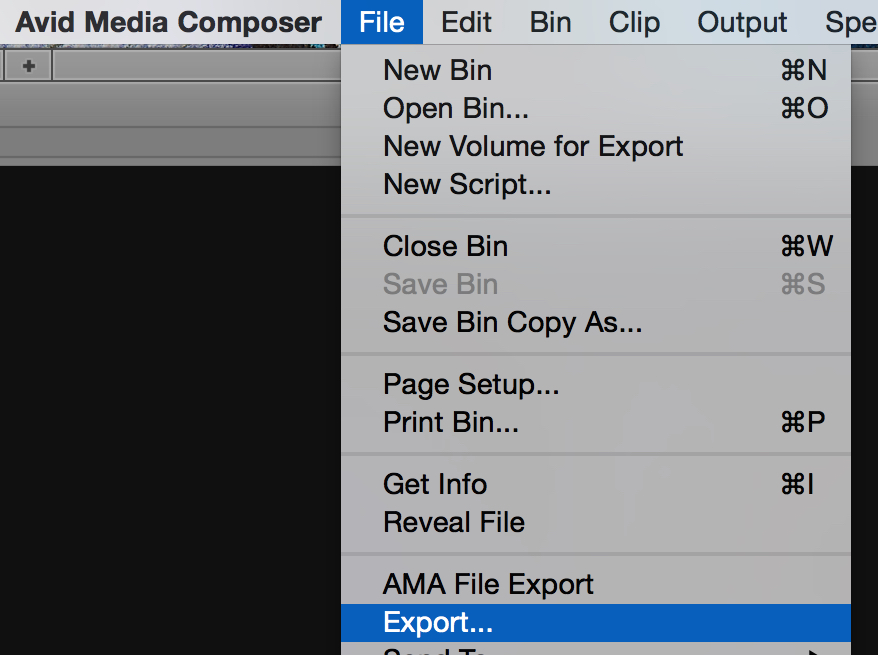
Step 9
Go to the ‘File Menu’ and Select ‘Export…’
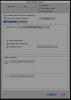
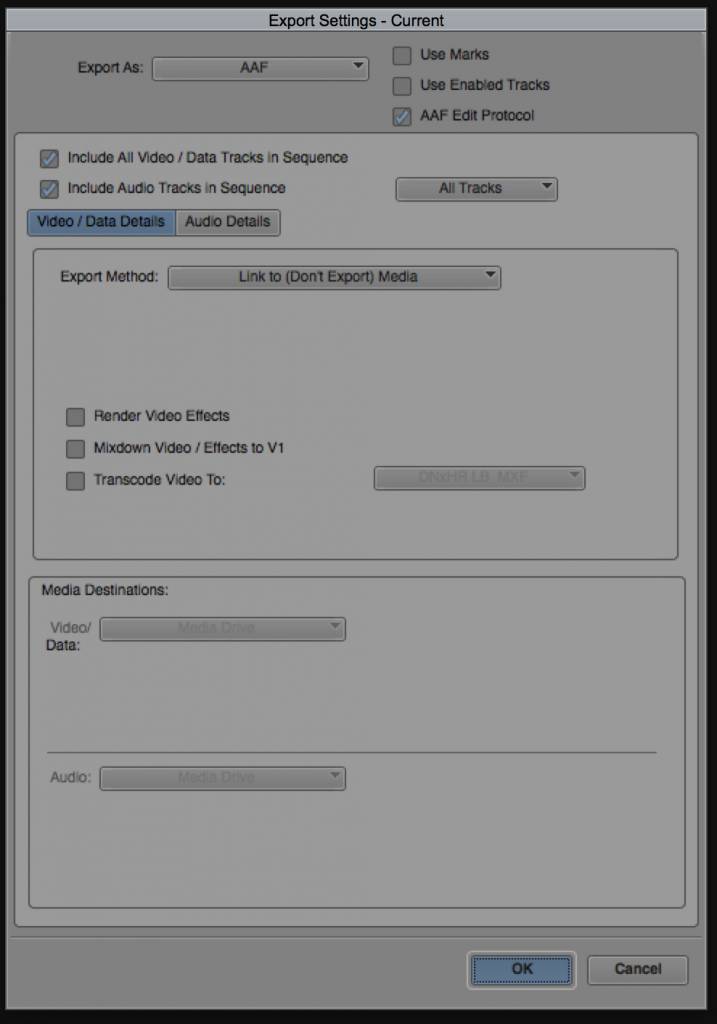
Step 10
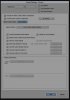
AAF Export Settings Video / Data Details Settings
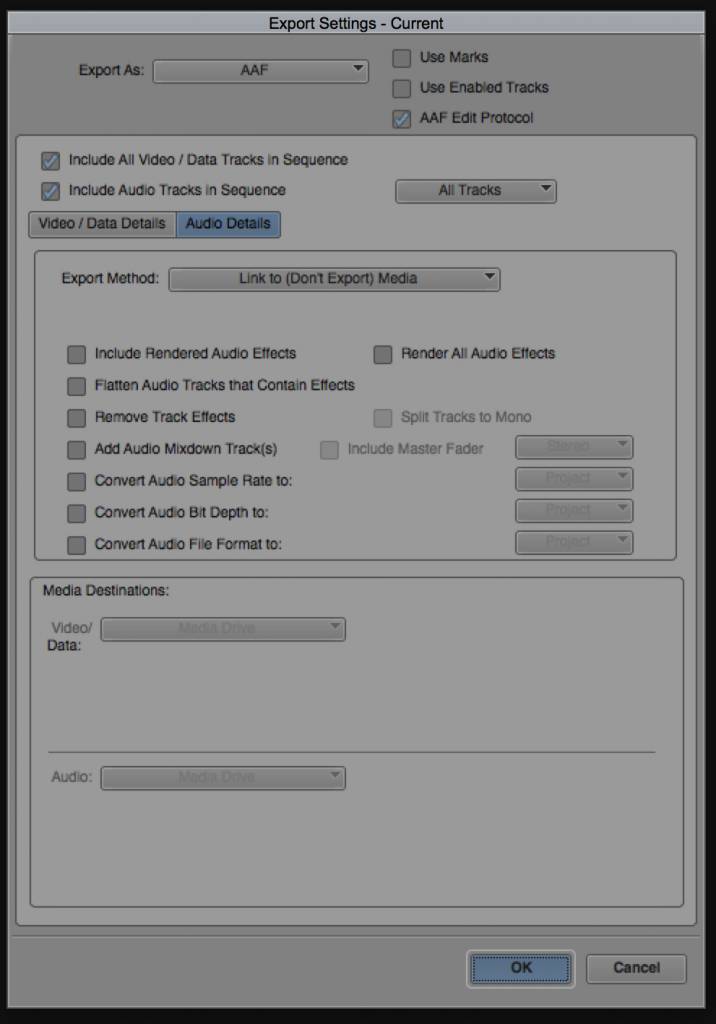
Step 11
AAF Audio Details Settings
In DaVinci Resolve
Step 12
In Master Project Settings > Under Conform Options > Choose Assist using reel names from the: Source clip filename. Mixed frame rate format: Resolve.
Step 13
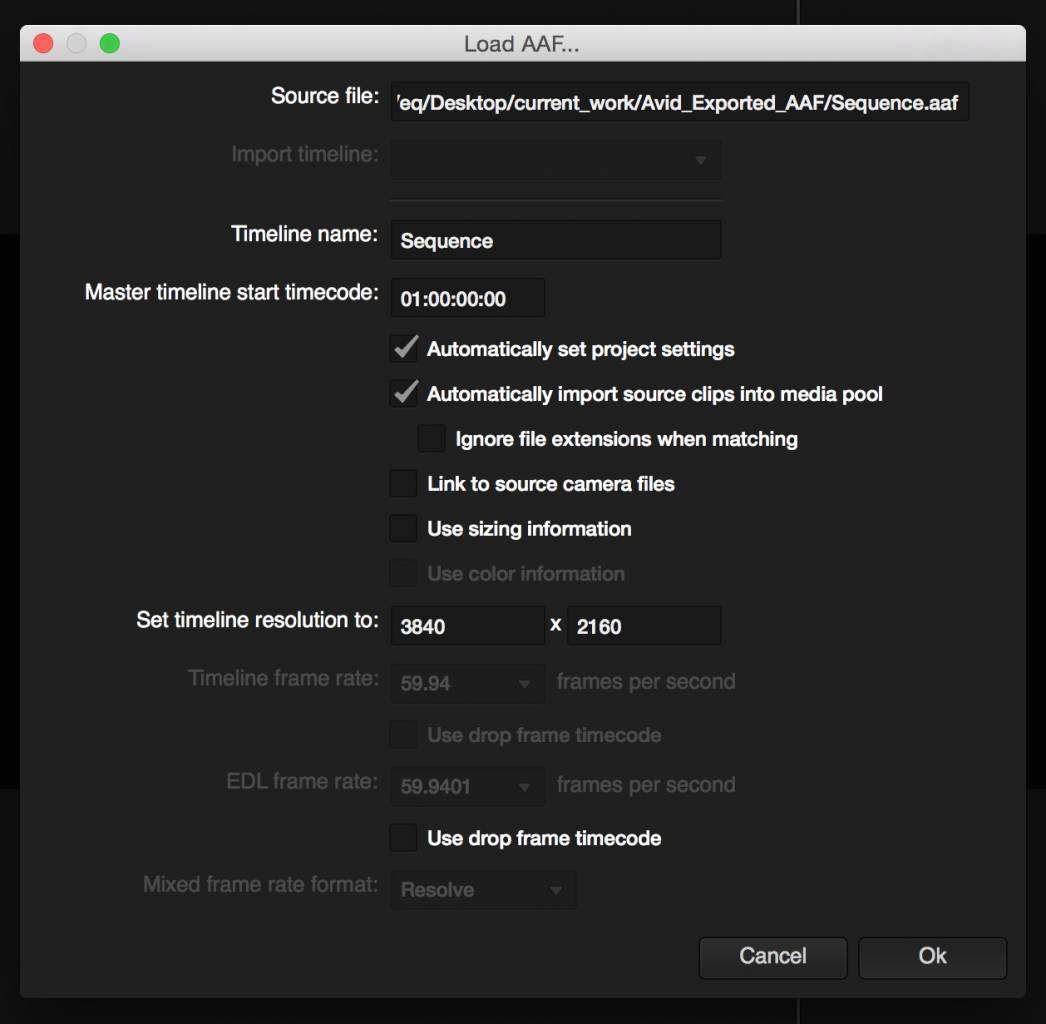
Import the AAF.
Put a check mark next to ‘Automatically import source clips into media pool’.
Mixed frame rate set to format: “Resolve”
Step 14
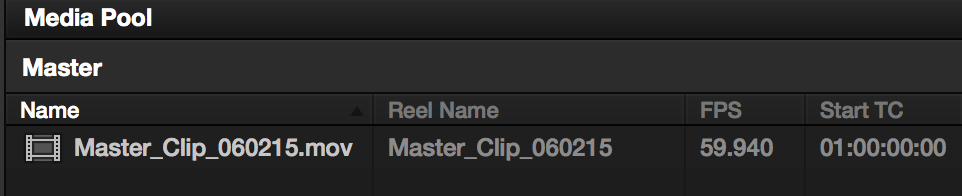
Clip is added to the media pool and a timeline is created. Color correct as needed.

Step 15
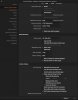
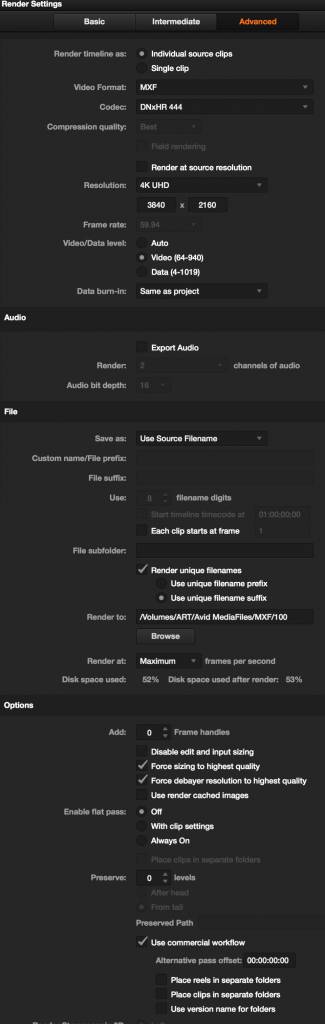
Go to the ‘Delivery Page’ and click on the ‘Advanced’ tab.
In Render Settings
Render timeline as: ‘Individual source clips’
Video Format: ‘MXF’
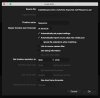
Under ‘File’ Section
Place a check mark next to the words ‘Render unique filenames’
Next to ‘Render at:’ click the ‘Browse’ button and select an Avid MediaFiles/MXF/1 and then change the 1 to 11 so Resolve will make a new folder to contain the render.
Once the desired selections are in place at the bottom of the Render Settings click on the ‘Add Job to Render Queue’ button.
Under the ‘Render Queue’ click on the ‘Start Render’ button.
In Media Composer
Step 16
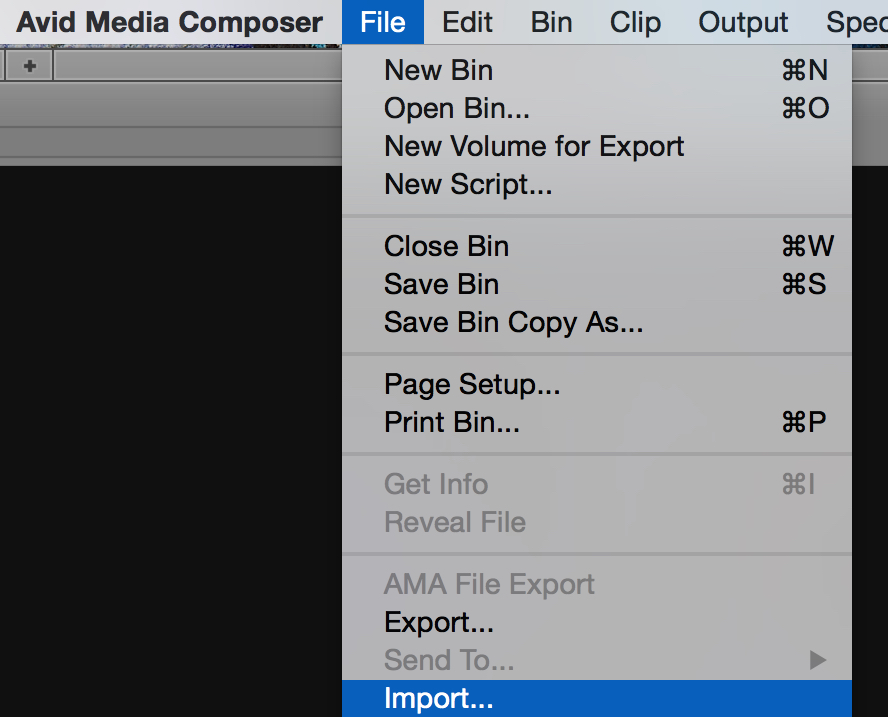
Create a new bin and title it ‘Resolve_Essence’. Select the bin and go to the ‘File Menu’ and choose the ‘Import’ command.
Step 17
Navigate to the numbered ’11’ folder and select the ‘msmMMOB.mdb’ file.

Step 18
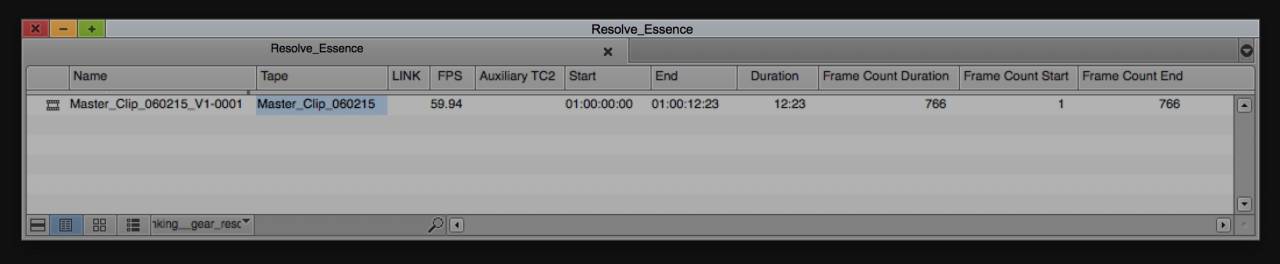
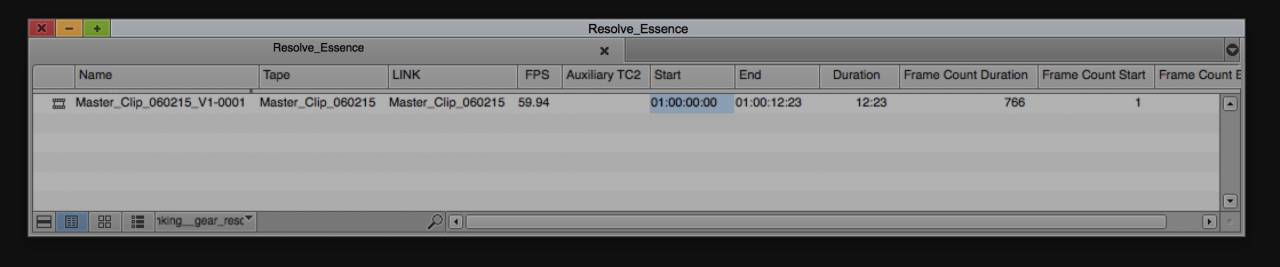
In the ‘Resolve_Essence’ Bin, click on the column heading titled ‘Tape’. The metadata in the ‘Tape’ column becomes selected for the master clip.

Step 19
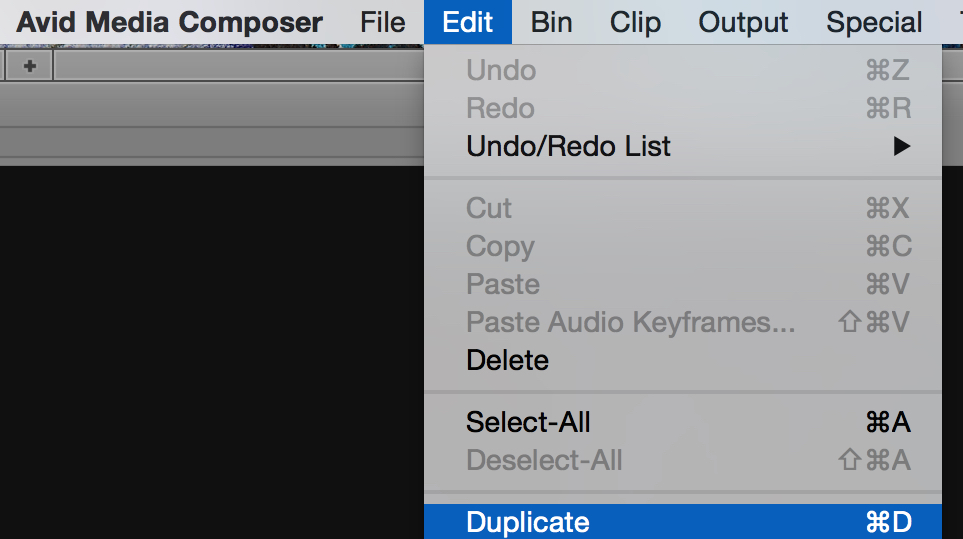
While the ‘Tape’ column is selected, go to the ‘Edit Menu’ and choose the ‘Duplicate’ command. The ‘Select’ window appears.

Step 20
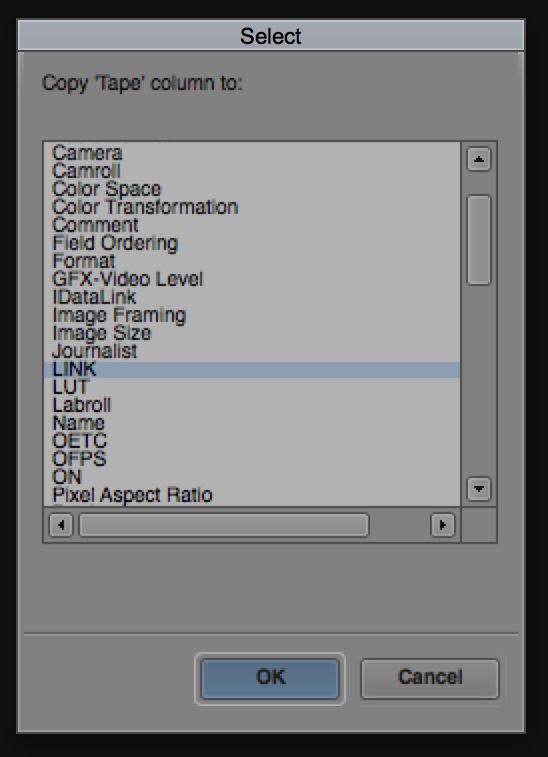
In the ‘Select’ window, from the displayed list, click on the ‘LINK’ heading to select it. Click the ‘OK’ button at the bottom of the ‘Select’ window.
Step 21
In the Avid Bin, click on the column heading titled ‘Start’. The metadata in the ‘Start’ column becomes selected for the master clip.

Step 22
While the ‘Start’ column is selected, go to the ‘Edit Menu’ and choose the ‘Duplicate’ command. The ‘Select’ window appears.

Step 23
In the ‘Select’ window, from the displayed list, click on the ‘Auxiliary TC2’ heading to select it. Click the ‘OK’ button at the bottom of the ‘Select’ window.
Step 24
Duplicate the original sequence and place it into the ‘Resolve Essence’ Bin.
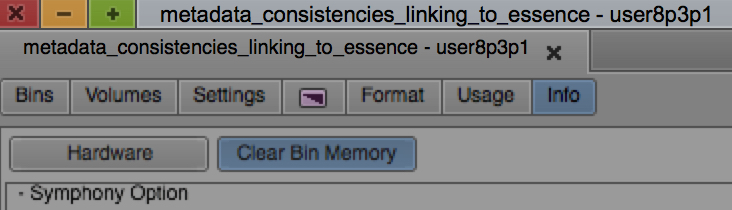
Step 25
In the Project Window click the ‘Info’ tab and then click the ‘Clear Bin Memory’.

Step 26
Open up the ‘Resolve_Essence’ Bin and select the Sequence and the Master Clip.

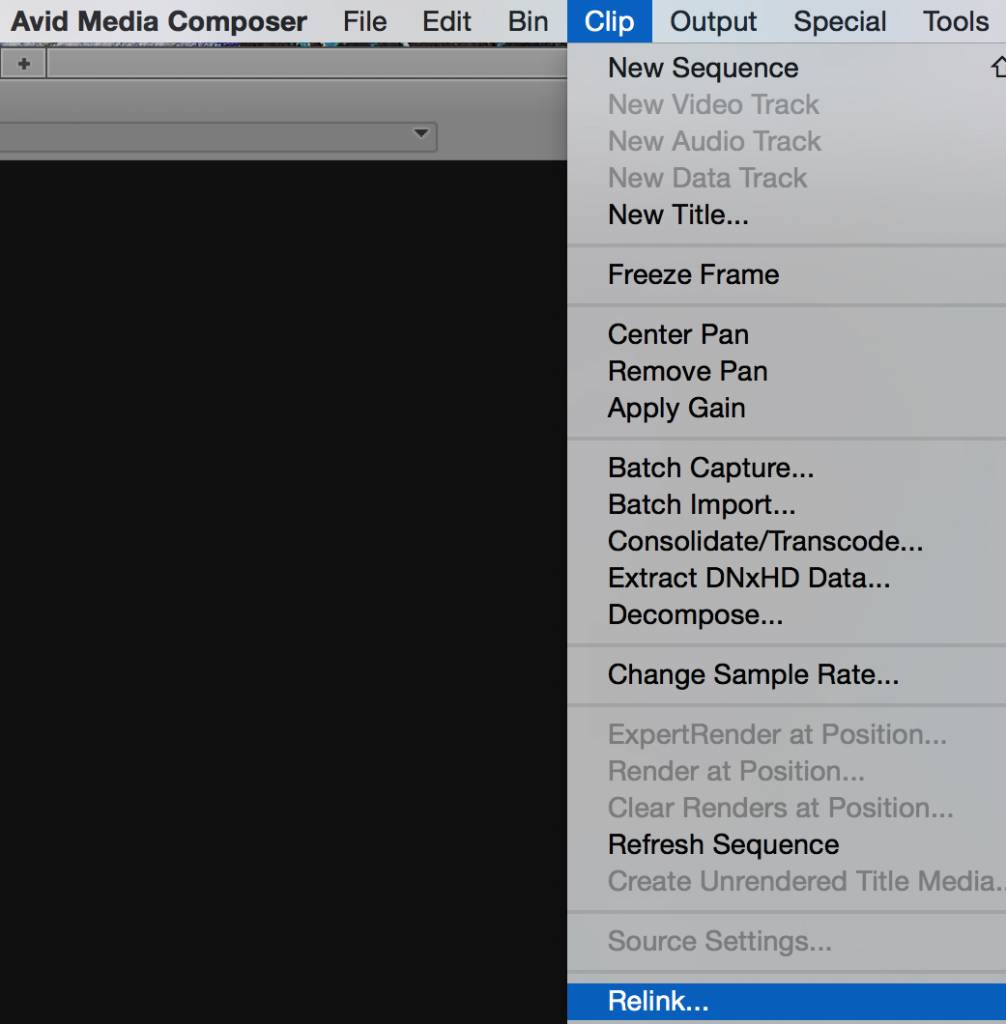
Step 27
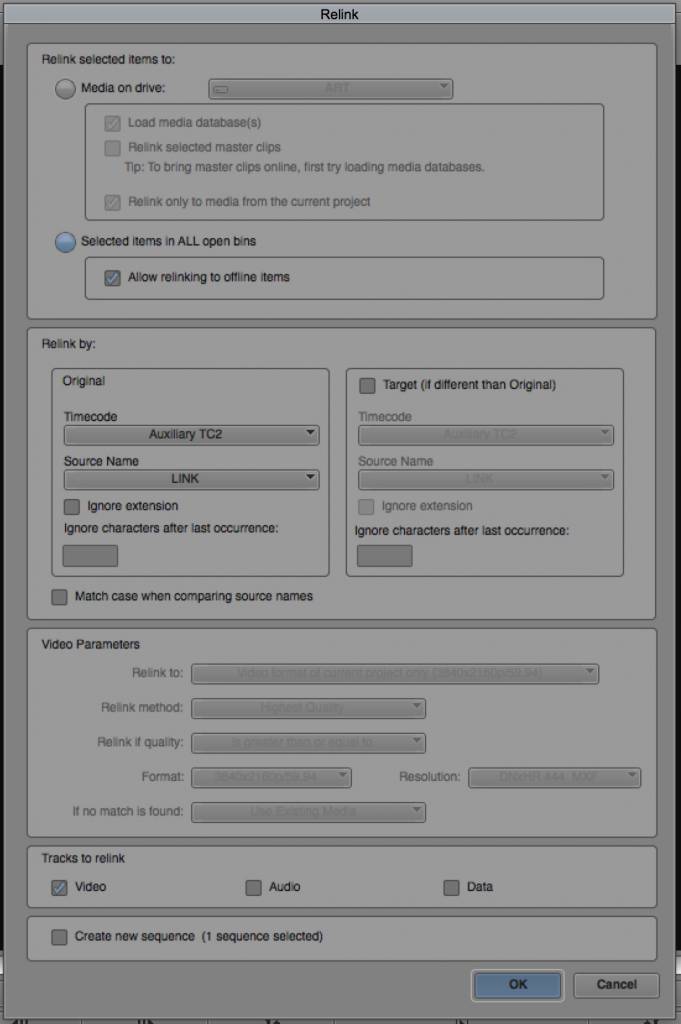
Go to the ‘Clip Menu’ and choose the ‘Relink…’ command. The ‘Relink’ window appears.
Step 28
Select the following and click on the ‘OK’ button.
Matching Framerates is Imperative
Now that Avid for 2K and plus projects support transcodes at the source file’s FPS, matching the ‘FPS’ in Media Composer and Resolve is imperative.
Non-Destructive Metadata
I should also mention this advantage to this three-column approach. Specifically, the strength of using the Auxiliary TC2 columm in the relink is that it is non-destructive to the start timecode metadata of the source clip!
Especially if one master clip is drop and the other master clip for some reason is non-drop, the Auxiliary TC2 metadata is just that lovely path that glides the master clip to the sequence. Just pick a timecode number as that connection force, and place it into the Auxiliary TC2 column for both the master clips in question.
If this metadata management is done at the first moment when the master clip is created, then the user can maintain clean columns of metadata that are safe when transcoding and consolidating.
I have been talking about a Media Composer – Resolve – Media Composer roundtrip, but this is an awesome AMA workflow if the Avid user wants to stay inclusive to Avid for the online conform and color. You can AMA, then transcode, then re-AMA, relink to the Avid Sequence, and then retranscode thus staying Avid inclusive—while at the same time, still using this technique to go to Resolve and back again, again and again, for endless deliverables that meet specifications both invented and yet to be invented.
Three pieces of metadata from each master clip are important for roundtripping from Blackmagic Design DaVinci Resolve to Avid Media Composer. Just three. Learn where they are, manage them consistently, and you will be able to use this metadata to manage ‘essence’ (the actual media) in your Media Composer-Resolve roundtrips with perfect, painless control:
- Frames Per Second Metadata (FPS)
- Timecode Metadata – assigned to each frame (Auxiliary TC2)
- Identifier Name Metadata (LINK)
As you scan down this article, what follows may look complicated. That is only because, instead of skipping things that other tutorials think you SHOULD know, I want you to see everything you NEED to know.
This really is a very simple approach using just those three metadata columns per master clip. Pay attention to those three columns, and you will have all of the power to make the Avid Relink Command do exactly what you want it to.
Note: the path I am illustrating is Avid Media Composer v8.3.1 to Blackmagic Design DaVinci Resolve v11.3.1, and back to Media Composer v8.3.1.
In Avid Media Composer
Step 1
Go to the ‘File Menu’ and choose the ‘AMA Link…’ command. Select a source file on the storage device. A master clip is created in the Avid Bin.
Step 2
In the Avid Bin, click on the column heading titled ‘Name’. The metadata in the ‘Name’ column becomes selected for the master clip.
Step 3
While the ‘Name’ column is selected, go to the ‘Edit Menu’ and choose the ‘Duplicate’ command. The ‘Select’ window appears.
Step 4
the ‘Select’ window, from the displayed list, click on the ‘LINK’ heading to select it. Click the ‘OK’ button at the bottom of the ‘Select’ window.
Step 5
In the Avid Bin, click on the column heading titled ‘Start’. The metadata in the ‘Start’ column becomes selected for the master clip.
Step 6
While the ‘Start’ column is selected, go to the ‘Edit Menu’ and choose the ‘Duplicate’ command. The ‘Select’ window appears.
Step 7
In the ‘Select’ window, from the displayed list, click on the ‘Auxiliary TC2’ heading to select it. Click the ‘OK’ button at the bottom of the ‘Select’ window.
Now the master clip is ready to be cut into a sequence. Cut the master clip into a sequence.
Step 8
Select the Sequence in the Avid Bin.
Step 9
Go to the ‘File Menu’ and Select ‘Export…’
Step 10
AAF Export Settings Video / Data Details Settings
Step 11
AAF Audio Details Settings
In DaVinci Resolve
Step 12
In Master Project Settings > Under Conform Options > Choose Assist using reel names from the: Source clip filename. Mixed frame rate format: Resolve.

Step 13
Import the AAF.
Put a check mark next to ‘Automatically import source clips into media pool’.
Mixed frame rate set to format: “Resolve”
Step 14
Clip is added to the media pool and a timeline is created. Color correct as needed.
Step 15
Go to the ‘Delivery Page’ and click on the ‘Advanced’ tab.
In Render Settings
Render timeline as: ‘Individual source clips’
Video Format: ‘MXF’
Under ‘File’ Section
Place a check mark next to the words ‘Render unique filenames’
Next to ‘Render at:’ click the ‘Browse’ button and select an Avid MediaFiles/MXF/1 and then change the 1 to 11 so Resolve will make a new folder to contain the render.
Once the desired selections are in place at the bottom of the Render Settings click on the ‘Add Job to Render Queue’ button.
Under the ‘Render Queue’ click on the ‘Start Render’ button.
In Media Composer
Step 16
Create a new bin and title it ‘Resolve_Essence’. Select the bin and go to the ‘File Menu’ and choose the ‘Import’ command.
Step 17
Navigate to the numbered ’11’ folder and select the ‘msmMMOB.mdb’ file.

Step 18
In the ‘Resolve_Essence’ Bin, click on the column heading titled ‘Tape’. The metadata in the ‘Tape’ column becomes selected for the master clip.
Step 19
While the ‘Tape’ column is selected, go to the ‘Edit Menu’ and choose the ‘Duplicate’ command. The ‘Select’ window appears.
Step 20
In the ‘Select’ window, from the displayed list, click on the ‘LINK’ heading to select it. Click the ‘OK’ button at the bottom of the ‘Select’ window.
Step 21
In the Avid Bin, click on the column heading titled ‘Start’. The metadata in the ‘Start’ column becomes selected for the master clip.
Step 22
While the ‘Start’ column is selected, go to the ‘Edit Menu’ and choose the ‘Duplicate’ command. The ‘Select’ window appears.
Step 23
In the ‘Select’ window, from the displayed list, click on the ‘Auxiliary TC2’ heading to select it. Click the ‘OK’ button at the bottom of the ‘Select’ window.
Step 24
Duplicate the original sequence and place it into the ‘Resolve Essence’ Bin.
Step 25
In the Project Window click the ‘Info’ tab and then click the ‘Clear Bin Memory’.
Step 26
Open up the ‘Resolve_Essence’ Bin and select the Sequence and the Master Clip.

Step 27
Go to the ‘Clip Menu’ and choose the ‘Relink…’ command. The ‘Relink’ window appears.
Step 28
Select the following and click on the ‘OK’ button.
Matching Framerates is Imperative
Now that Avid for 2K and plus projects support transcodes at the source file’s FPS, matching the ‘FPS’ in Media Composer and Resolve is imperative.
Non-Destructive Metadata
I should also mention this advantage to this three-column approach. Specifically, the strength of using the Auxiliary TC2 columm in the relink is that it is non-destructive to the start timecode metadata of the source clip!
Especially if one master clip is drop and the other master clip for some reason is non-drop, the Auxiliary TC2 metadata is just that lovely path that glides the master clip to the sequence. Just pick a timecode number as that connection force, and place it into the Auxiliary TC2 column for both the master clips in question.
If this metadata management is done at the first moment when the master clip is created, then the user can maintain clean columns of metadata that are safe when transcoding and consolidating.
I have been talking about a Media Composer – Resolve – Media Composer roundtrip, but this is an awesome AMA workflow if the Avid user wants to stay inclusive to Avid for the online conform and color. You can AMA, then transcode, then re-AMA, relink to the Avid Sequence, and then retranscode thus staying Avid inclusive—while at the same time, still using this technique to go to Resolve and back again, again and again, for endless deliverables that meet specifications both invented and yet to be invented.